通用密封GENERAL SEALING
1. INTRODUCTION 介绍
WARNING :DO NOT USE THIS PROCEDURE TO APPLY SEALANT TO ENCAPSULATE FASTENERS IN THE FUEL TANK. THIS PROCEDURE WILL NOT AGREE WITH EME (ELECTROMAGNETIC EFFECTS) REQUIREMENTS. IF YOU DO NOT OBEY, DAMAGE TO EQUIPMENT AND INJURY TO PERSONNEL CAN OCCUR.
警告:请勿使用此程序在油箱中涂抹密封剂以封装紧固件。此程序不符合电磁效应(EME)要求。如果不遵守,可能会导致设备损坏和人员受伤。
A. The data in this subject comes from Boeing Process Specification BAC5000, and Boeing drawings 140W4001, 65-89033 and 69B13372. Access to the Boeing Process Specifications is available.
本主题中的数据来自波音工艺规范 BAC5000 和波音图纸 140W4001、65-89033 和 69B13372。可访问波音工艺规范。
B. The data is general. It is not about all situations or specific installations. Use this data to help you write minimum requirements.
数据为通用数据。不适用于所有情况或特定安装。使用这些数据来帮助您编写最低要求。
C. Refer to SOPM 20-00-00 for a full list of all the vendor names and addresses.
供应商名称和地址的完整列表请参考SOPM 20-00-00。
NOTE: Refer to other specific maintenance instructions (i.e. AMM, SRM, CMM, SB, etc.) for fastener installation in the fuel tank.
注意:油箱内紧固件的安装请参考其他特定维护说明(i.e. AMM, SRM, CMM, SB, etc.)。
2. MATERIALS 材料
NOTE: Equivalent substitutes can be used.
注意:可以使用等效替代品。
A. Sealants
密封剂
(1) Coating compound, electrical insulating
涂层化合物,电绝缘
(a) BMS 5-37, Type 1, Class A-1
(b) BMS 5-37, Type 1, Class B
(2) Dow Corning RTV 730, V71984
(3) Dow Corning Q3-7063, V71984
(4) Dow Corning 3-6093, V71984
(5) Dow Corning 3-6376, V71984
(6) Dow Corning 93-006, V71984
(7) Firewall sealant, hydraulic fluid resistant — BMS 5-63
防火墙密封胶,耐液压油——BMS 5-63
(8) General Electric RTV 174, V01139
通用电气 RTV 174,V01139
(9) Low density sealant — BMS 5-142
低密度密封胶——BMS 5-142
(10) Low density integral fuel tank sealant — BMS 5-45 (Supersedes BMS 5-26)
低密度整体油箱密封胶——BMS 5-45(取代BMS 5-26)
(11) Low density polyurethane sealant — BMS 5-93
低密度聚氨酯密封胶——BMS 5-93
(12) Modified epoxy adhesive — BMS 5-92, Type 1 (BAC5010, Type 70) (SOPM 20-50-12)
改性环氧胶——BMS 5-92,类型1(BAC5010,类型70)(SOPM 20-50-12)
(13) PR-1826, Class B-1/2 and B-1/4 (dark gray), V83574
(14) PR-1828, Class B-1/2 and B-1/4 (white), V83574
(15) PR-1405G, V83574
(16) Pressure and environmental sealant, chromate type — BMS 5-95
压力和环境密封胶,铬酸盐类型——BMS 5-95
(17) Two-part hole filling compound — BMS 5-16
双组分孔填充化合物——BMS 5-16
B. Sealant Primers
密封胶底漆
(1) Dow Corning 1200 Red, V71984
(2) Firewall sealant primer — BMS 5-63
防火墙密封胶底漆——BMS 5-63
(3) Polyurethane primer — BMS 5-93
聚氨酯底漆——BMS 5-93
(4) PR-1826 Class B-1/2 and B-1/4 primer, V83574
C. Parting Agents
脱模剂
(1) AC962-73C
(2) AZ534-2B, V0A3C8
(3) AZ634-2, V0A3C8
(4) Coating solution — 1 weight part MIL-I-7444 vinyl tubing dissolved in 4 weight parts cyclohexanone with 1 weight percent Ferro F20629 chrome cobalt pigment, V94630
涂层溶液——按重量比,1份MIL-I-7444乙烯管溶解在4,份环己酮中,并添加,百分之一的Ferro F20629铬钴颜料,V94630
(5) FreKote 44NC, V1JB33 or V51257
(6) FreKote 48NC, V1JB33 or V51257
(7) FreKote 710NC, V1JB33 or V51257
(8) Guardsman 598-5002 green strippable coating, V17359 (new supply not available)
(9) MS 122A, V18598 (new supply not available)
(10) MS 122DF, V18598 (new supply not available)
(11) MS 143N, V18598 (new supply not available)
(12) MS 122RA, V18598
(13) MS 122RB, V18598
(14) Partall Coverall Film, V17629
(15) Spraylat SC-1071H-1 Blue (ZR-5827), V87354
D. Solvents
溶剂
(1) Aliphatic naphtha — TT-N-95, Type 2
脂肪烃石脑油——TT-N-95,类型2
(2) Biogenic SE 377C, V13091
(3) Citra – Safe, V0K209
(4) Cleaning solvent, presealing — BMS 11-7
(5) Cyclohexanone
(6) Dowclene EC, V96717
(7) FCC-55, V87664
(8) Freon 113, V18873
(9) Glidsafe Prepsolv, V84397
(10) Isopropyl alcohol — TT-I-735
异丙醇——TT-I-735
(11) Methyl ethyl ketone (MEK) — ASTM D740 or JIS-K-1524
甲基乙基酮(MEK)——ASTM D740或JIS-K-1524
(12) Methyl propyl ketone (MPK) — BMS 11-9
甲基丙基酮(MPK)——BMS 11-9
(13) Sec-butyl alcohol — ASTM D 1007 or TT-B-848
仲丁醇——ASTM D 1007或TT-B-848
(14) Trichlorethane — O-T-620
三氯乙烷——O-T-620
(15) Toluene — TT-T-548
甲苯——TT-T-548
E. Miscellaneous Materials
杂项材料
(1) Abrasive sheet, aluminum oxide, 100 grit or finer — Scotch-Brite Type A, V76381
研磨片,氧化铝,100目或更细——Scotch-Brite,V76381
(2) Applicators, foam rubber
涂抹器,泡沫橡胶
(3) Bottles, plastic spray, hand held, trigger action
塑料喷雾瓶,手持式,扳机式
(4) Brushes, non-metallic natural or synthetic — Marsell 311
非金属天然或合成刷子——Marsell 311
(5) Caps, molded polysulfide seal — BACC50AJ
模制聚硫密封盖——BACC50AJ
(6) Cloth, fiberglass — BMS 9-3 Type H-2 or H-3, Class optional
玻璃纤维布——BMS 9-3 H-2或H-3型,可选等级
(7) Cones, kraft paper
牛皮纸锥
(8) Covers, seal — BACC30H
密封盖——BACC30H
(9) Covers, seal — BACC30N
密封盖——BACC30N
(10) Detackifying solution for BMS 5-63 sealant — Dapocast 18-4, V58093
BMS 5-63密封胶脱粘剂——Dapocast 18-4,V58093
(11) Enamel — BMS 10-11, Type 2 (SOPM 20-60-02)
瓷釉——BMS 10-11,类型2(SOPM 20-60-02)
(12) Foam, polyimide — BMS 8-300, Type 1
泡沫,聚酰亚胺——BMS 8-300,类型1
(13) Nozzles, roller — Semco 232693 (replacement roller: 232701), V85570
喷嘴,滚筒——Semco 232693(替换滚筒:232701),V85570
(14) Nozzles, plastic sealant gun
喷嘴,塑料密封胶枪
(15) Primer — BMS 10-11, Type 1 (SOPM 20-60-02)
底漆——BMS 10-11,类型1(SOPM 20-60-02)
(16) Primer — BMS 10-20, Type 2 (SOPM 20-60-02)
底漆——BMS 10-20,类型2(SOPM 20-60-02)
(17) Primer — BMS 10-103, Type 1 (SOPM 20-60-02)
底漆——BMS 10-103,类型1(SOPM 20-60-02)
(18) Resin, fiberglass — BMS 8-201, Type 2 (SOPM 20-60-04)
树脂,玻璃纤维——BMS 8-201,类型2(SOPM 20-60-04)
(19) Swabs, cotton
棉签
(20) Tape, fiberglass joint — Perma-Tite, V22116
胶带,玻璃纤维接头——Perma-Tite,V22116
(21) Tongue depressors
压舌板
(22) Tubs, paper, with lid (flex-style food cups), V21842
纸盆,带盖(柔性食品杯),V21842
(23) Wipers — BMS 15-5, Class A (SOPM 20-60-04)
刷子——BMS 15-5,A级(SOPM 20-60-04)
3. EQUIPMENT 设备
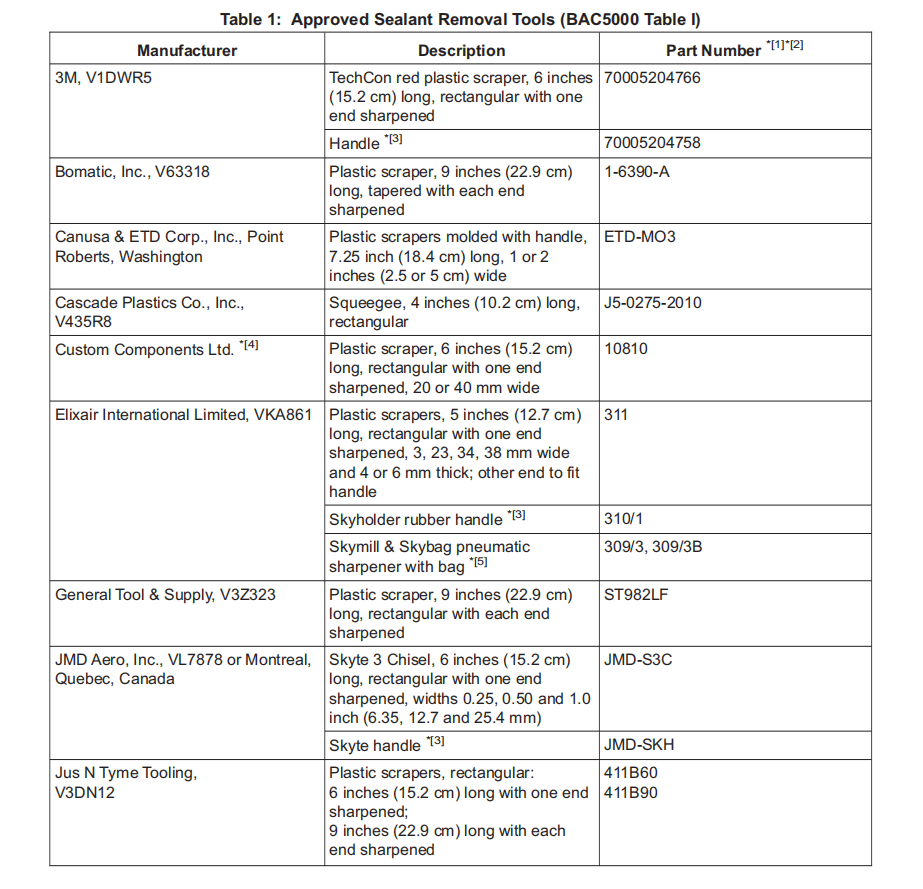
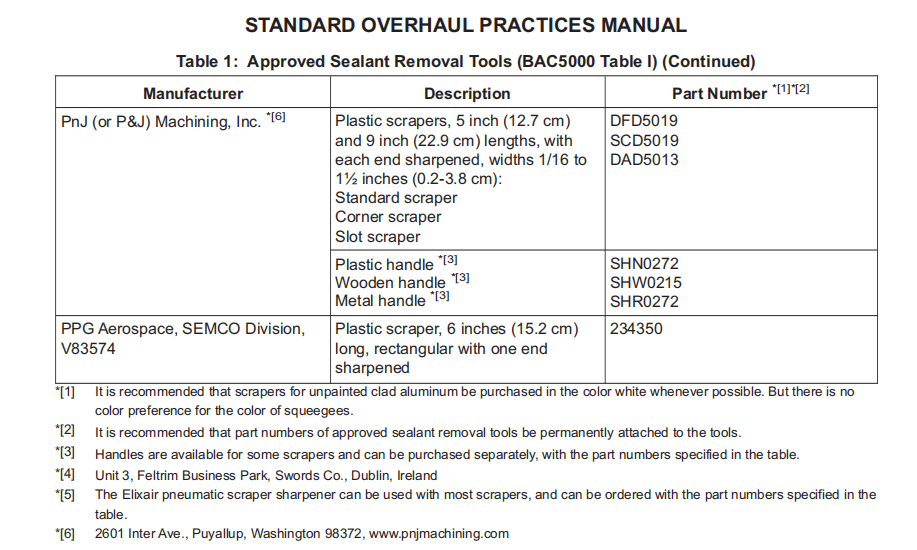
A. To remove cured sealant from unpainted clad aluminum surfaces on the exterior fuselage, use the tools in Table 1. These tools can be used also during cleaning and paint removal operations.
若要去除机身外部未上漆的包覆铝表面上的固化密封剂,请使用表1中的工具。这些工具也可用于清洁和除漆操作。
B. These tools agree with BSS7384 for removal of cured sealant from unpainted clad aluminum surfaces on the exterior of the airplane fuselage. Other sealant removal tools can be used if they agree with BSS7384.
这些工具符合BSS7384标准,可用于去除飞机机身外部未上漆的包覆铝表面上的固化密封剂。如果符合BSS7384标准,也可使用其他密封剂去除工具。
C. To remove cured sealant from surfaces other than unpainted clad aluminum on the exterior fuselage, use plastic or hardwood tools that do not scratch those surfaces and that do not cause problems with paint or sealant bonds.
若要从机身外部未上漆的包覆铝表面以外的其他表面去除固化密封胶,请使用不会刮伤这些表面且不会影响油漆或密封胶粘结的塑料或硬木工具。
D. Scrapers can be sharpened with 220-grit or finer aluminum oxide paper. Before you use a sharpened scraper, rub it with a BMS 15-5 Class A wiper to remove loose sanding particles. If you use an alternate procedure to sharpen the scraper, such as a metal sharpening wheel, rub the sharpened scraper on 220-grit or finer aluminum oxide paper to remove unwanted material, then rub the scraper with a BMS 15-5 Class A wiper to remove loose sanding particles.
刮刀可用220目或更细的氧化铝纸打磨。使用打磨后的刮刀前,请先用BMS 15-5 A级刷子擦拭,去除松散的打磨颗粒。如果您使用其他方法来打磨刮刀,例如金属打磨轮,请在220目或更细的氧化铝纸上打磨刮刀,去除不需要的材料,然后用BMS 15-5 A级刷子子擦拭刮刀,去除松散的打磨颗粒。
4. DEFINITIONS 定义
A. Application time — Same as pot life.
适用时间——与适用期相同。
B. Cured sealant — The condition when the sealant has a hardness of 30 minimum on a Rex A or Shore A durometer.
固化密封胶——密封胶在Rex A或Shore A硬度计上的硬度至少达到30时的状态。
C. Cure time — The time necessary for sealant to become hard (see cured sealant), measured at 72-82°F and 45-55 percent relative humidity.
固化时间——密封胶变硬所需的时间(见固化密封胶),在72-82°F和45-55%相对湿度下测量。
D. Sealing levels
密封等级
(1) Absolute level — All openings of all types, and fasteners, are sealed. An isolated operation on self-sealing fasteners is not necessary unless specified by overhaul instructions.
绝对密封——所有类型的开口和紧固件都进行了密封。除非大修说明有特别要求,否则无需对自密封紧固件进行单独操作。
(2) Extensive level — All holes, slots, joggles and seams are sealed. Flanges of nutplates without O-rings are sealed. Bolts in holes larger than a specified diameter, in metal or composite structure, are sealed.
全面密封——所有孔、槽、凸缘和接缝都进行了密封。没有O形圈的螺母法兰进行了密封。金属或复合材料结构中大于规定直径的孔中的螺栓进行了密封。
(3) Intermediate level — All holes, slots, joggles and seams are sealed.
中级密封——所有孔、槽、凸缘和接缝均密封。
(4) Limited level — All holes, slots and joggles are sealed.
限定级密封——所有孔、槽和凸缘均密封。
E. Seal types
密封类型
(1) Backup seal — A seal that gives physical support to a primary seal, such as an injection or prepack seal.
辅助密封——为主密封提供物理支撑的密封,例如注射密封或预填充密封。
(2) Injection seal — Sealant applied through an open-ended channel.
注射密封——通过开口通道施加密封剂。
(3) Isolation seal — A seal that holds back fuel after failure of a primary seal.
隔离密封——在主密封失效后阻止燃料泄漏的密封。
(4) Prepack seal — Sealant applied in structure cavities before assembly to prevent air pockets in the cavities.
预填充密封——在组件组装前涂覆在结构空腔中的密封剂,用于防止空腔中出现气穴。
(5) Primary seal — Applied sealant that directly touches fuel.
主密封——直接接触燃料的涂覆密封剂。
(6) Secondary seal — Applied sealant that does not directly touch fuel.
次密封——不直接接触燃料的涂覆密封剂。
5. GENERAL 通用
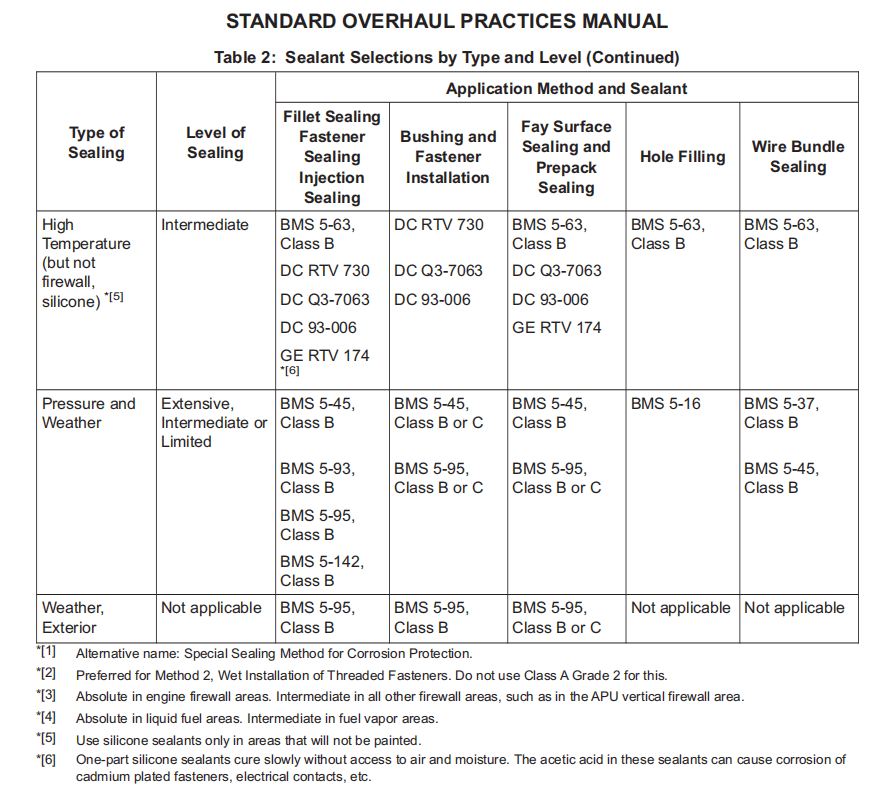
A. Use the sealant as specified by the overhaul instructions. If the overhaul instructions do not give the sealant, see Table 2 for recommended sealants.
按照大修说明中的规定使用密封剂。如果大修说明中没有提供密封剂,请参阅表2中推荐的密封剂。
B. Identify all tools and equipment which you use on silicone sealants, and do not use them with other sealants. You can use a permanent label, or color codes, tape stripes or the equivalent, along with a sign in the area that identifies these codes or stripes. Equipment used for silicone sealants must not be used for non-silicone sealants because the silicone cannot be completely cleaned out. Silicone contamination of non-silicone sealants will not let them make a good bond with the surfaces.
确定您在硅酮密封剂上使用的所有工具和设备,不要将其用于其他密封剂。您可以使用永久性标签、或颜色代码、胶带条或类似标记,并在该区域放置标识这些代码或条带的标牌。用于硅酮密封胶的设备不得用于非硅酮密封胶,因为硅酮无法完全清除。非硅酮密封胶受到硅酮污染后,无法与表面良好粘合。

6. SURFACE PREPARATION 表面处理
CAUTION :APPLY CLEANERS OR SOLVENTS FROM DISPENSERS. DO NOT USE TOO MUCH.
注意:请使用分配器中的清洁剂或溶剂。请勿使用过量。
A. General
通用
(1) Remove chips and loose contamination from the areas with a blast of compressed air, vacuum, or clean wipers or clean bristle brushes wet with one of these solvents:
用压缩空气、真空吸尘器或干净的湿抹布或湿毛刷清除这些区域中的碎屑和松散污染物,抹布或毛刷应浸入以下溶剂中:
(a) BMS 11-7
(b) Citra Safe
(c) Dowclene EC
(d) FCC-55
(e) Methyl ethyl ketone
甲基乙基酮
(f) Methyl ethyl ketone/sec-butyl alcohol mix, 42 to 58 ratio
甲基乙基酮/仲丁醇混合物,比例为42:58
(g) Methyl propyl ketone
甲基丙基酮
(h) Trichloroethane
三氯乙烷
(2) As an alternative to Paragraph 6.A.(1), you can clean the surfaces as specified in BAC5744 (SOPM 20-30-03) if the areas can be fully rinsed. Do not use this alternative in an enclosed structure where water can collect or get into cracks and joints.
作为第 6.A.(1) 款的替代方案,如果区域可以完全冲洗干净,则可以按照 BAC5744(SOPM 20-30-03)的规定清洁表面。请勿在封闭结构中使用此替代方案,因为水可能会积聚或渗入裂缝和接缝中。
(3) Solvent clean hydraulic fluid contamination as specified in SOPM 20-30-03.
按照 SOPM 20-30-03 的规定,用溶剂清洁液压油污染。
(4) Final clean the surfaces with a wiper only damp, not wet, with solvent. Wipe the surfaces dry with a dry wiper before the solvents evaporate.
最后用溶剂将表面擦拭干净,但只能使用微湿的刷子,不能弄湿。在溶剂蒸发之前,用干燥的雨刷将表面擦干。
(a) Do this immediately before you apply sealant or primer, unless the surface is unpainted composite laminate.
除非表面是未上漆的复合层压板,否则应在涂密封胶或底漆之前立即进行擦拭。
(b) Use a solvent from the list in Paragraph 6.A.(1). Citra Safe can become unwanted matter unless it is wiped dry with clean wipers.
使用第 6.A.(1) 段所列溶剂。除非用干净的刷子擦干,否则 Citra Safe 可能会变成不需要的物质。
(5) Give the cleaned surfaces protection from contamination. Cleaned assemblies can be masked along their edges.
保护干净的表面免受污染。干净的组件边缘可用遮蔽物遮盖。
(6) To prevent crazing, use only aliphatic naphtha to clean on or near acrylic surfaces.
为防止裂纹,仅可使用脂肪族石脑油清洁丙烯酸表面或附近区域。
B. Painted Surfaces
油漆表面
(1) Use the procedures of Paragraph 6.A. unless specified below.
除非下文另有说明,否则应按照第 6.A 款所述程序进行。
(2) BMS 10-60, Type 1 enamel:
BMS 10-60,类型 1 瓷漆:
(a) If sealants BMS 5-45 Class B-2 or BMS 5-93 will be applied, clean the enamel surface. Then sand the surface with Scotch-Brite sheets to remove all gloss, before you final clean. Do not sand through the enamel layer.
如果将使用密封剂 BMS 5-45 B-2 等级或 BMS 5-93,请清洁搪瓷表面。然后在最终清洁前用Scotch-Brite牌砂纸打磨表面,去除所有光泽。不要打磨穿过搪瓷层。
(3) BMS 10-11, Type 1 primer:
BMS 10-11,1 类型底漆:
(a) Cured less than 72 hours — Do not clean the primer layer. You can apply sealants BMS 5-95, Class B or C, or BMS 5-142, Class B, to this primer layer if the primer was cured a minimum of 1 hour at 60°F minimum, and the surface did not get contamination. The relative humidity must not be higher than 85 percent.
固化时间少于72小时——不要清洁底漆层。如果底漆在60°F下固化至少1小时,且表面没有受到污染,则可以在该底漆层上涂覆BMS 5-95(B级或C级)或BMS 5-142(级)密封剂。相对湿度不得超过85%。
(b) Cured more than 72 hours — Clean as specified in Paragraph 6.A.
固化超过72小时——按照第6.A段的规定进行清洁。
(c) If you must touch up the layer of primer, first solvent clean the old layer as specified in Paragraph 6.A. Then touch up the layer as necessary. Let this primer cure as specified in Paragraph 6.B.(3)(b) before you apply the sealant. Be sure to keep the primer layer clean during the cure.
如果必须修补底漆层,首先按照第6.A段的规定用溶剂清洁旧涂层,然后根据需要进行修补。在涂密封胶之前,按照第6.B.(3)(b)段的规定固化底漆。固化期间,务必保持底漆层清洁。
C. Surfaces Not Painted
未上漆的表面
(1) Clean metal surfaces as specified in Paragraph 6.A.
按照第 6.A 款的规定清洁金属表面。
(2) Abrasive clean composite laminate surfaces with 150-grit or finer abrasive paper (BAC5837 Cleaning Method 1 or 2) and solvents as specified in Paragraph 6.A.(1).
使用 150 目或更细的砂纸(BAC5837 清洁方法 1 或 2)和第 6.A. (1) 段规定的溶剂对复合层压板表面进行研磨清洁。
D. Surfaces with Contamination by Other BMS 3-23, Type 2 Compounds, and BMS 3-29 Corrosion Preventive Compound.
表面沾染了其他 BMS 3-23、类型 2 化合物和 BMS 3-29 防腐蚀化合物。
(1) Remove as much of the compound as possible with wipers and BMS 11-7 solvent, or the mixture of methyl ethyl ketone and sec-butyl alcohol, or methyl propyl ketone, or FCC-55 solvent. Immediately wipe the surface dry with a clean wiper.
用刷子和BMS 11-7溶剂,或甲基乙基酮和仲丁醇的混合物,或甲基丙基酮,或FCC-55溶剂,尽可能多地清除化合物。立即用干净的刷子将表面擦干。
(2) Clean an area approximately one inch out from the area which will get the sealant.
清洁距离将要涂密封胶的区域约一英寸的区域。
(3) Replace the wipers when they become dirty because of the removed corrosion preventive compound.
当防蚀剂被清除后,应更换变脏的刷子。
(4) Wipe the area until you see no corrosion preventive compound on the wipers.
擦拭该区域,直到刷子上没有防腐蚀剂为止。
(5) If this is a painted surface, sand the area with 240 grit or finer sandpaper. Be careful to do this only to the area which will get the sealant. Do not sand through the primer. Then solvent clean the surface with wipers and a solvent from the list in Paragraph 6.A.(1).
如果这是喷漆表面,请使用240目或更细的砂纸打磨该区域。注意仅打磨将要涂密封胶的区域。不要打磨底漆。然后使用刷子和第6.A.(1)段列出的溶剂清洁表面。
(6) Examine the cleaned area for water breaks.
检查清洁区域是否有断水。
(a) If the surface does not have water breaks, let it dry.
如果表面没有断水,让其干燥。
(b) If the surface has water breaks, clean the surface again and again until there are no water breaks.
如果表面有断水,反复清洁表面,直到没有断水。
(7) Be sure to prevent contamination of the cleaned surface.
确保清洁表面不被污染。
(8) Apply sealant as specified in Paragraph 8.
按第8段所述涂抹密封胶。
7. TWO-PART SEALANT PREPARATION 双组分密封胶的准备
A. General
通用
(1) Be sure to use the base component with the accelerator component of the same batch number. Do not mix components of different batch numbers. The batch number is identified on the containers.
确保使用同一批号的基料和促进剂。不要混合不同批号的成分。批号在容器上标明。
(2) Weigh the two components in the proportions specified on the container, within +/-5 percent.
按容器上指定的比例称量两种成分,误差不超过+/-5%。
(3) Mix the base by itself until its color is continuous.
单独混合基料,直到颜色是连续的。
(4) Mix the accelerator by itself, as recommended by the vendor.
按照供应商的建议单独混合促进剂。
(5) Fully mix the base with the accelerator until smooth and continuous. A machine mixer is recommended.
将基料与促进剂充分混合,直至光滑(均匀)、连续。建议使用机器搅拌机。
(6) Equipment used to mix silicone sealants must not be used to mix non-silicone sealants, because the silicone cannot be completely cleaned out. This silicone contamination can prevent a good bond of non-silicone sealants.
用于混合硅酮密封胶的设备不得用于混合非硅酮密封胶,因为硅酮无法完全清除。这种硅酮污染会妨碍非硅酮密封胶的良好粘结。
B. Machine Mixing
机器混合
(1) We recommend that you mix the sealant materials in a machine mixer. Use a mixer sufficiently large for the quantity of material necessary for the task.
我们建议您使用机器搅拌机混合密封胶材料。请使用足够大的搅拌机,来处理任务所需的材料。
(2) Use the procedure of Paragraph 7.A. to mix the sealants.
请按照第7.A.段所述步骤混合密封胶。
(3) If mixed batches of Class B sealants BMS 5-45, BMS 5-95 or BMS 5-142 will be put in refrigerated storage, do tests of the cure time with a Rex A durometer. The specimen must be a minimum of 0.25 inch thick. The surface of the specimen must have a sufficiently large area to let the presser foot of the durometer touch the specimen. Keep the hardness data available until the sealant pot life expires. Do not use the mixed sealant until the cure time test is complete.
如果混合批次的B类密封胶BMS 5-45、BMS 5-95或BMS 5-142将放入冷藏室,请使用Rex A硬度计测试固化时间。试样厚度必须至少为0.25英寸。试样表面必须具有足够大的面积,以便硬度计的压脚能够接触试样。在密封胶的适用期内,应保留硬度数据。在固化时间测试完成前,请勿使用混合后的密封胶。
C. Hand Mixing
手工混合
(1) Small quantities (50-200 grams) of sealant can be mixed by hand, as for small tasks or repairs.
少量(50-200克)密封胶可手工混合,用于小型任务或维修。
(2) Use the procedure of Paragraph 7.A. to mix the sealants.
按照第7.A.段所述步骤混合密封胶。
D. Semkit Mixing
Semkit混合
(1) Mix by hand or with a machine the sealants that come in vendor-supplied kits, such as Semkits.
用手或机器混合密封胶,密封胶由供应商提供的密封胶套装(如Semkits)提供。
(2) Use the vendor instructions to mix the sealant.
按照供应商的说明混合密封胶。
(3) Make sure the mixed sealant comes out from the cartridge as a smooth material with a continuous color.
确保混合后的密封胶从筒中流出时呈连续色且质地光滑。
E. Mix Ratios
混合比例
(1) Use the mix ratios recommended by the sealant vendor. These ratios can be by volume or weight.
使用密封胶供应商推荐的混合比例。这些比例可以是体积比或重量比。
(2) Do not use other mix ratios, because the application life could become too short or too long.
不要使用其他混合比例,因为可能会导致使用寿命过短或过长。
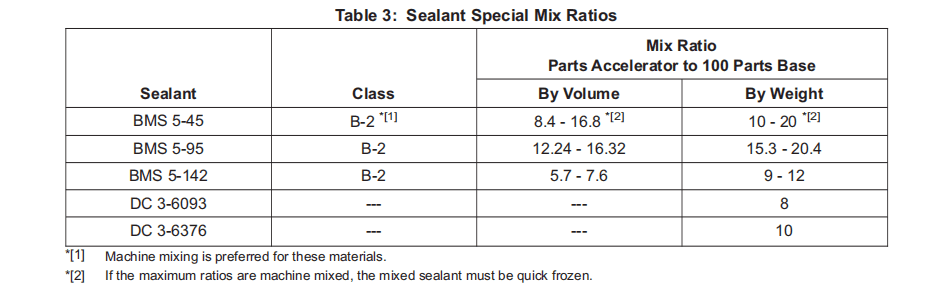
(3) See Table 3 for recommended mix ratios for some sealants.
某些密封胶的推荐混合比例见表3。
F. Refrigerated Storage of Bulk Machine-Mixed Sealants
散装机器混合密封胶的冷藏储存
(1) These sealants can be refrigerated, immediately after they are mixed, to let them be used for longer than their usual application time:
这些密封胶可以在混合后立即冷藏,让它们的使用时间比它们通常的使用时间更长(以延长其使用时间):
(a) BMS 5-16
(b) BMS 5-37
(c) BMS 5-45
(d) BMS 5-63
(e) BMS 5-95
(f) BMS 5-142
(g) Dow Corning 93-006
(2) All mixed material put into refrigerated storage must be in polyethylene cartridges or aluminum toothpaste-type tubes. Mixed BMS 5-95, Class B or BMS 5-142, Class B sealants can also be put into refrigerated storage in kraft paper cones. Unwaxed paper tubs with lids can be used for refrigerated storage of BMS 5-45, Class A sealant. Each container must have this data on it:
放入冷藏室的所有混合材料必须装在聚乙烯筒或铝制牙膏管中。BMS 5-95、B级或BMS 5-142、B级混合密封胶也可以装在牛皮纸锥形容器中放入冷藏室。BMS 5-45、A级密封胶可以放入带盖的无蜡纸桶中冷藏。每个容器上必须注明以下信息:
(a) Vendor’s part number
供应商件号
(b) BMS number, type, and application time
BMS编号、类型和应用时间
(c) Batch number
批号
(d) Date the sealant was mixed
密封胶混合日期
(e) Date the sealant will expire
密封胶有效期
(f) Who mixed the sealant
密封胶混合人员
(g) Applicable hazard warnings, as specified in Hazard Communication Standard OSHA 1910.1200
适用危险警告,如《危险品公示标准》OSHA 1910.1200中规定
(3) We recommend that the mixed sealants be quick-frozen to get the maximum application time and storage life. To quick freeze the sealants:
我们建议将混合好的密封胶快速冷冻,以获得最长的使用时间和储存期限。快速冷冻密封胶的方法如下:
(a) Immediately after you mix the sealant, fill the polyethylene cartridges or aluminum toothpaste-type tubes with the sealant.
混合密封胶后,立即将密封胶注入聚乙烯筒或铝制牙膏类型管中。
(b) Put polyethylene caps or plugs on the tubes.
在管子上盖上聚乙烯盖子或塞子。
(c) Put the cartridges or tubes in a liquid bath at -60°F for a minimum of 10 minutes.
将密封胶筒或密封胶管放入-60°F的液体槽中至少10分钟。
(d) Do not quick freeze silicone sealants in liquids cooled by dry ice.
不要用干冰冷却的液体快速冷冻硅酮密封胶。
(e) Do not quick freeze in air. Put the polyethylene cartridges directly in the solution. Application time will be shorter if these cartridges are put in metal containers.
不要在空气中快速冷冻。将聚乙烯密封胶筒直接放入溶液中。如果将这些密封胶筒放入金属容器中,则应用时间会更短。
(4) The refrigerated storage can be in air, dry ice or carbon dioxide. But do not use dry ice or carbon dioxide for storage of silicone sealants, because the gas will change the cure of the sealant.
冷藏储存可在空气中、干冰或二氧化碳中进行。但不要使用干冰或二氧化碳来储存硅酮密封胶,因为气体会改变密封胶的固化。
(5) Refer to BAC5000 for data about storage temperatures and times for the different sealants.
有关不同密封胶的储存温度和时间,请参考BAC5000。
G. How to Thaw Refrigerated Sealant
如何解冻冷藏密封胶
(1) When you thaw the refrigerated sealant, let it warm to approximately 70°F before you use it. Make sure the condensation is gone from the container, and, when it is wiped, the condensation does not come back.
解冻冷藏密封胶时,在使用前应使其温度升至约70°F。确保容器内没有冷凝水,且擦拭后不会再次出现冷凝水。
(2) Do not use a microwave oven to thaw the refrigerated sealant.
请勿使用微波炉解冻冷藏密封胶。
(3) If the sealant is warmed to above 80°F, it could become too thin and have a shorter application time. If the sealant is colder than 60°F, it could be too thick, not come out in a good bead, or the moisture on it could prevent a good bond.
如果密封胶的温度升至80°F以上,可能会变得太稀,导致涂抹时间缩短。如果密封胶的温度低于60°F,可能会变得太稠,无法形成良好的密封胶条,或者其中的水分可能会妨碍密封胶的粘结效果。
(4) Do not freeze the thawed sealant. Discard the thawed sealant if you cannot use it during its application time.
解冻后的密封胶不要冷冻。如果无法在密封胶的涂抹时间内使用,请丢弃解冻后的密封胶。
8. APPLICATION OF SEALANT 密封胶的应用
A. Do not apply sealants when the temperature of the structure is below 50°F.
当结构温度低于 50°F 时,请勿涂抹密封胶。
B. The sealant will cure faster if you warm the structure before you apply the sealant, and also if you blow warm air over the applied sealant. You can also apply heat with a radiative device or an oven. Monitor the temperature of the sealant and the adjacent structure to make sure it stays at 140°F or less. Because relative humidities below 40 percent will slow down the sealant cure, you can add water to the air to increase the relative humidity. Refer to BAC5000 for properties of the sealants such as application time, squeeze-out time, tack free time and cure time.
如果在涂抹密封胶前加热结构,或在涂抹的密封胶上吹暖风,密封胶会更快固化。您也可以使用辐射装置或烤箱加热。监测密封胶和相邻结构的温度,确保温度保持在140°F或以下。由于相对湿度低于40%会减缓密封胶的固化速度,因此可以向空气中加水以增加相对湿度。有关密封胶的特性,如适用时间、挤出时间、不粘时间以及固化时间,请参阅BAC5000。
C. Silicone materials can give contamination to each other and get contamination from other materials. Then the cure or bond quality could be decreased. Be very careful when you clean the areas. Isolate the operation and the equipment from other operations. Do not cure silicone sealants near or in the same oven as polysulfide sealants. Be sure the equipment used with silicone sealant is not used with other sealants, and has labels to tell you this.
硅酮材料之间会相互污染,也会受到其他材料的污染。这样会导致固化或粘结质量下降。清洁这些区域时要格外小心。将操作和设备与其他操作隔离开来。不要在多硫化物密封胶的烤箱附近或同一烤箱内固化硅酮密封胶。确保使用硅酮密封胶的设备不与其他密封胶共用,并贴有相关标识。
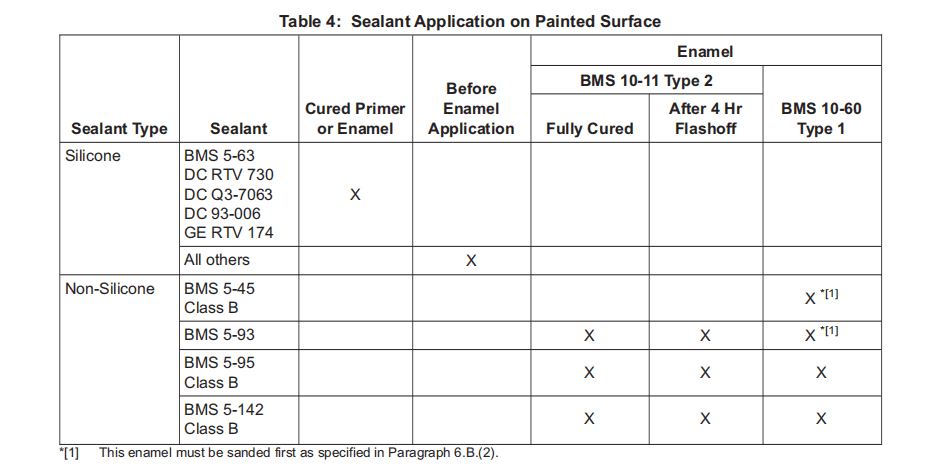
D. If the overhaul instructions do not tell you which sealant to use on a surface that has a specified primer or enamel, see Table 4 for recommended sealants when you know the primer or enamel. Refer to Paragraph 6.B. for procedures to prepare the painted surface.
如果大修说明没有告知您应在涂有指定底漆或瓷漆的表面上使用哪种密封剂,请在知道底漆或瓷漆的情况下参阅表4了解推荐的密封剂。请参阅第6.B.段了解准备涂漆表面的步骤。
E. After you apply the sealant, do not let grease, oil, metal chips or other such contamination get into the sealant.
涂抹密封剂后,请勿让油脂、油、金属屑或其他此类污染物进入密封剂。
F. To give the applied sealant protection from contamination, you can apply BMS 10-11 Type 1 primer or Type 2 enamel, BMS 10-20 Type 2 primer, or BMS 10-103 Type 1 primer on non-silicone sealants. (Do not try to apply primer to silicone sealants, because primer will not bond to or stay on silicone sealant.) Use a brush or spray equipment to apply the primer or enamel, and apply it at these sealant conditions:
为了保护已涂密封胶免受污染,您可以在非硅酮密封胶上涂覆BMS 10-11类型1底漆或类型2瓷漆、BMS 10-20类型2底漆或BMS 10-103类型1底漆。(不要尝试在硅酮密封胶上涂底漆,因为底漆不会粘附或附着在硅酮密封胶上。)使用刷子或喷涂设备涂底漆或瓷漆,并在以下密封胶条件下进行涂覆:
(1) Class A — When the sealant is tack-free.
A级——当密封胶没有粘性时。
(2) Classes B, D — Immediately after you apply the sealant.
B、D级——涂覆密封胶后立即进行。
(3) Classes C, G — Immediately after you completely assemble the structure.
C、G级——完成组装结构后立即进行。
(4) Class E — One hour minimum after you apply the sealant.
E级——涂上密封胶至少一小时后。
G. To get a good seal, apply the sealant in this sequence:
为了获得良好的密封效果,请按以下顺序涂上密封胶:
(1) Apply faying surface seals and preassembly seals.
涂上接合面密封胶和预装配密封胶。
(2) Fill holes and slots.
填充孔和槽。
(3) Fill joggles and inject sealant into holes.
填充凸缘并将密封胶注入孔中。
(4) Apply fillet seals.
涂上圆角密封胶。
(5) Apply seals to fasteners
在紧固件上涂上密封胶
9. FAYING SURFACE SEALING 密封面密封
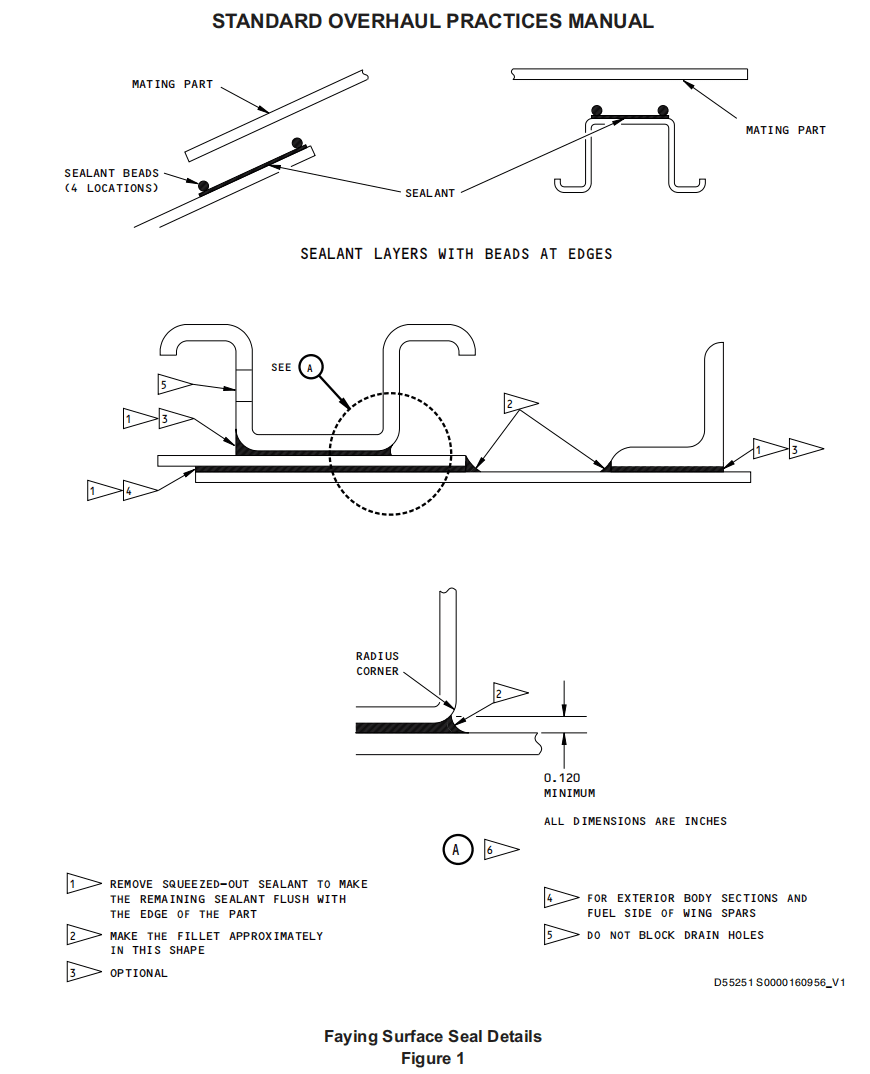
A. Complete all preassembly operations (refer to Figure 1) such as hole drilling, cold working and burr removal before you apply sealant. As an alternative, you can drill and ream through uncured faying surface sealant if you clamp the parts together to keep chips and burrs from between the mating surfaces.
在涂密封胶前,完成所有预装配操作(参见图1),例如钻孔、冷加工和去毛刺。 作为替代方案,如果将零件夹紧在一起,以防止碎屑和毛刺进入配合表面之间,则可以钻透未固化的密封面密封胶。
B. Clean the areas as specified in Paragraph 6.
按照第6段的规定清洁区域。
C. Basic Procedure
基本步骤
(1) Apply a smooth, continuous layer of sealant to one mating surface with a sealant gun, spatula, brush, roller, smooth or serrated scrapers, or spray gun. Make the layer cover all of the surface. A roller is the best tool for this. But do not roll or work the sealant too much as you apply it, because that could decrease the squeeze-out life of the sealant.
用密封胶枪、刮刀、刷子、滚筒、光滑或锯齿刮刀或喷枪在其中一个接合面上涂抹一层光滑、连续的密封胶。使该层覆盖整个表面。滚筒是最佳工具。但在涂抹时不要过多地滚动或操作密封胶,因为这会缩短密封胶的挤出寿命。
(2) Apply the layer sufficiently thick to fill the assembled faying surface and give a continuous bead at the edges when the parts are put together. Usually, a layer approximately 0.005 inch thick is sufficient. But a layer 0.010-0.030 thick could be necessary for some assemblies.
涂抹足够厚的密封胶,以填满组装后的接合表面,并在零件组装在一起时在边缘形成连续的密封胶条。通常,大约0.005英寸厚的密封胶层就足够了。但对于某些组件,可能需要0.010-0.030英寸厚的密封胶层。
(3) To make sure the sealant will come out at the edges, you can also apply a small bead of sealant near the edges of the mating surface, as shown.
为了确保密封胶从边缘溢出,您还可以在接合表面的边缘附近涂上一小滴密封胶,如图所示。
(4) Make sure the sealant is applied correctly and sufficiently, along with other necessary sealant installation, before the surfaces are put together.
在表面组装在一起之前,确保密封胶正确且充分地涂覆,并做好其他必要的密封胶安装工作。
(5) Put the surfaces together within the application time specified for the sealant.
在密封胶规定的适用时间内将接合表面接合在一起。
D. Areas Where the Access Is Not Easy
难以接近的区域
(1) As an alternative to the basic procedure, you can apply the sealant in approximately parallel beads to one of the mating surfaces. But you must be sure the parts can be held together sufficiently tightly, and you apply the sealant in beads of a size, interval, and direction to make the sealant become a continuous layer with a continuous bead at the edges when the parts are assembled and held together.
作为基本程序的替代方案,您可以在其中一个配合面上以大致平行的胶条涂敷密封胶。但您必须确保零件能够紧密贴合,并且您涂敷的胶条大小、间隔和方向应使密封胶在零件组装和固定一起时形成连续的层,边缘有连续的胶条。
(2) Apply a bead of sealant between each row of fasteners. Apply a minimum of one bead of sealant between the fastener rows and the edge of the faying surface.
在每列紧固件之间涂上一道密封胶。在紧固件列和接合面边缘之间至少涂一道密封胶。
(3) Put the mating surfaces together and apply sufficient clamping force to make the beads of sealant become a continuous layer of sealant, with a continuous bead of sealant at the edges. Be sure to do this within the application time specified for the sealant.
将配合面放在一起,施加足够的夹紧力,使密封胶形成连续的密封层,边缘有连续的密封胶。确保在密封胶规定的应用时间内完成。
E. Fasteners
紧固件
(1) Temporary or permanent fasteners that go through or adjacent to the faying surface seal must be installed before the end of the squeeze-out life of the sealant.
在密封胶挤出寿命结束之前,必须安装穿过或靠近密封面的临时或永久紧固件。
(2) If temporary fasteners are used, they must give approximately the same clamping pressure as the permanent fasteners specified by the overhaul instructions. Spring-loaded plunger-type Cleco fasteners do not give sufficient clamping force to make the sealant come out at the edges correctly.
如果使用临时紧固件,则其提供的夹紧压力必须与大修说明中规定的永久紧固件大致相同。弹簧载荷柱塞类型的Cleco紧固件不能提供足够的夹紧力,使密封剂正确地从边缘流出。
(3) When temporary fasteners are removed before the sealant is cured, be sure to keep the clamping pressure on the mating parts to hold them together, unless permitted by the overhaul instructions. Keep the parts tightly held together until the permanent fasteners are installed or until the sealant is fully cured.
在密封剂固化之前移除临时紧固件时,除非大修说明允许,否则请务必保持配合零件的夹紧压力,以将它们固定在一起。在安装永久紧固件或密封剂完全固化之前,请保持零件紧密固定在一起。
(4) The faying surface sealant layer is not as strong a bond as an adhesive. If you must move the unit after the sealant is cured but without the fasteners installed, be sure to hold the parts together or the seal could come apart.
密封胶层的粘合力不如粘合剂。如果密封胶固化后,但尚未安装紧固件,您必须移动设备,请务必将零件固定在一起,否则密封胶可能会脱落。
F. Squeezed-out Sealant
挤出密封胶
(1) After the parts are assembled, make sure there is a small bead or fillet of sealant all along the joint. Then remove or adjust this bead or fillet of sealant by applicable Paragraph 9.F.(2), Paragraph 9.F.(3) or Paragraph 9.F.(4).
零件组装完毕后,确保接缝处有密封胶小珠或小圆角。然后按照第9.F.(2)段、第9.F.(3)段或第9.F.(4)段所述方法去除或调整密封胶小珠或小圆角。
(2) On the exterior side of body laps and where fuel tank sealant will be applied, remove the squeezed-out sealant with a plastic or wooden tool, a dry wiper, or a clean cloth wet with a solvent from the list in Paragraph 6.A.(1).
在壳体搭接的外侧以及将要涂抹油箱密封胶的位置,用塑料或木质工具、干式刷子或用第6.A.(1)段所列溶剂浸湿的干净抹布清除挤出密封胶。
(3) Where laminated shims are included in fay-surface-sealed joints, the sealant must completely cover the laminated ends of the shims. If it does not, or if necessary to make the fillet, add more Class B sealant to make a continuous fillet of the dimensions shown.
如果密封接缝中包含层叠垫片,密封胶必须完全覆盖垫片的层叠端。如果没有覆盖,或者有必要制作圆角,则应添加更多B级密封胶,以制作尺寸如图所示的连续圆角。
(4) For all other locations, do one of these steps:
对于所有其他位置,请执行以下步骤之一:
(a) Apply more Class B sealant along the joint edge to get the fillet as shown, or
沿接缝边缘涂抹更多B级密封胶,以形成所示圆角,或
(b) Make the squeezed-out sealant into a fillet approximately as shown, or
将挤出的密封胶挤压成大致如图所示的圆角,或
(c) Remove the squeezed-out sealant with a plastic or wooden tool, or a clean wiper wet with a solvent from the list in Paragraph 6.A.(1). The remaining sealant must fill the faying surface out to the edge of the part, as shown. If the squeezed-out sealant has contamination in it or the application time or squeezed-out time is expired, remove it and apply more Class B sealant as shown.
用蘸有第6.A.(1)段所列溶剂的塑料或木质工具或干净刷子清除挤出的密封胶。剩余的密封胶必须填满零件边缘的接合面,如图所示。如果挤出的密封胶中有杂质,或者使用时间或挤出时间已过,则将其清除,并如图所示涂抹更多的B类密封胶。
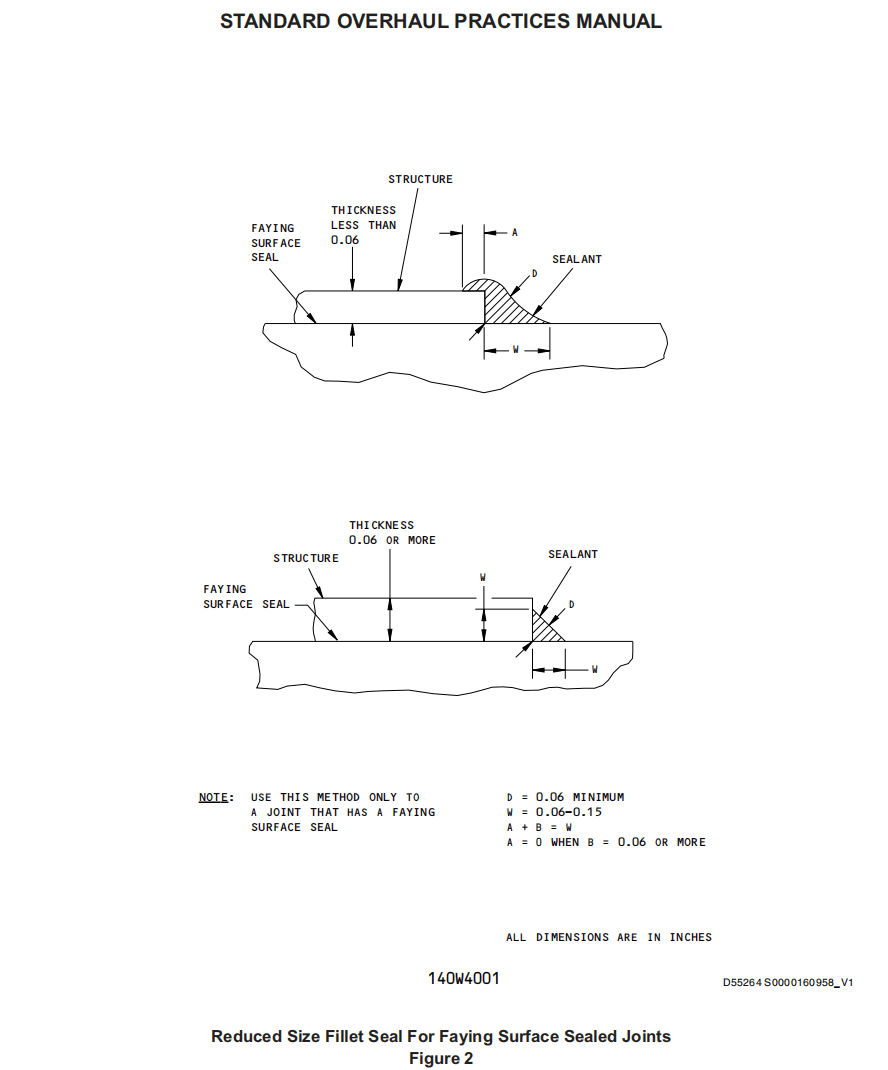
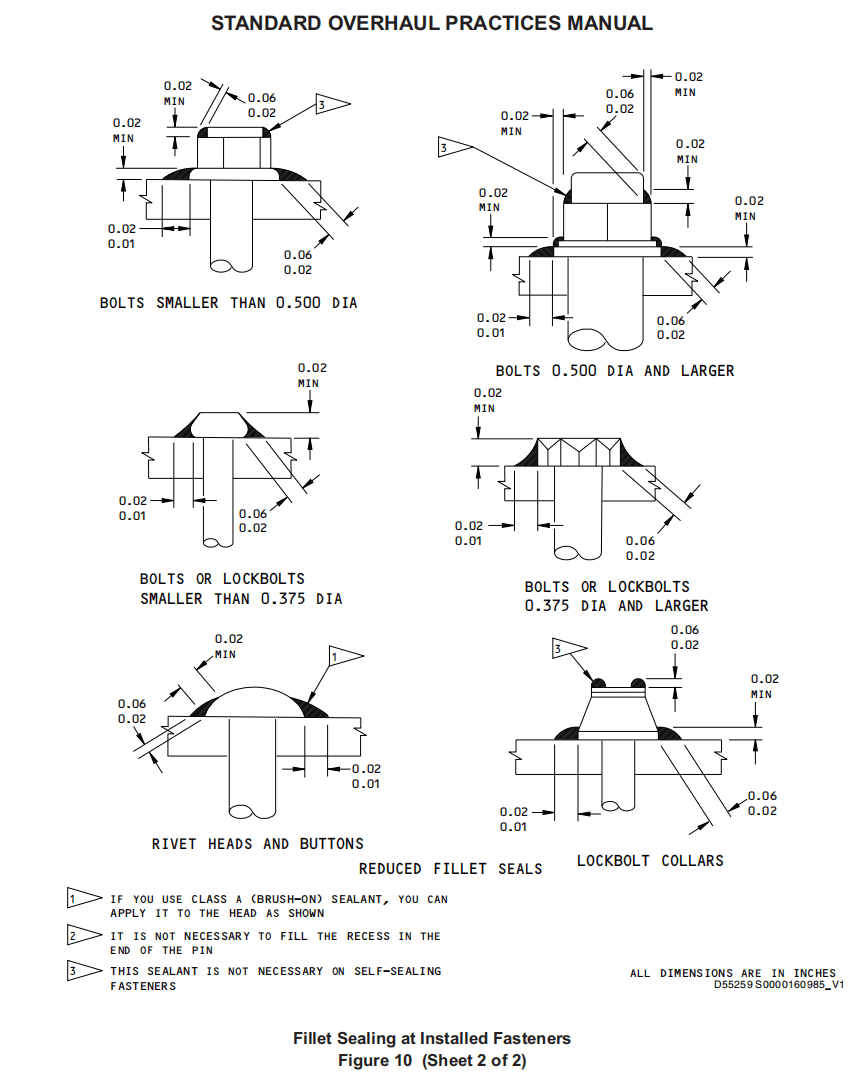
(5) If the overhaul instructions specify a reduced fillet, make the sealant configuration as shown in Figure 1 or Figure 2, as applicable.
如果大修说明中指定了缩小后的圆角,则根据具体情况按照图1或图2所示配置密封胶。
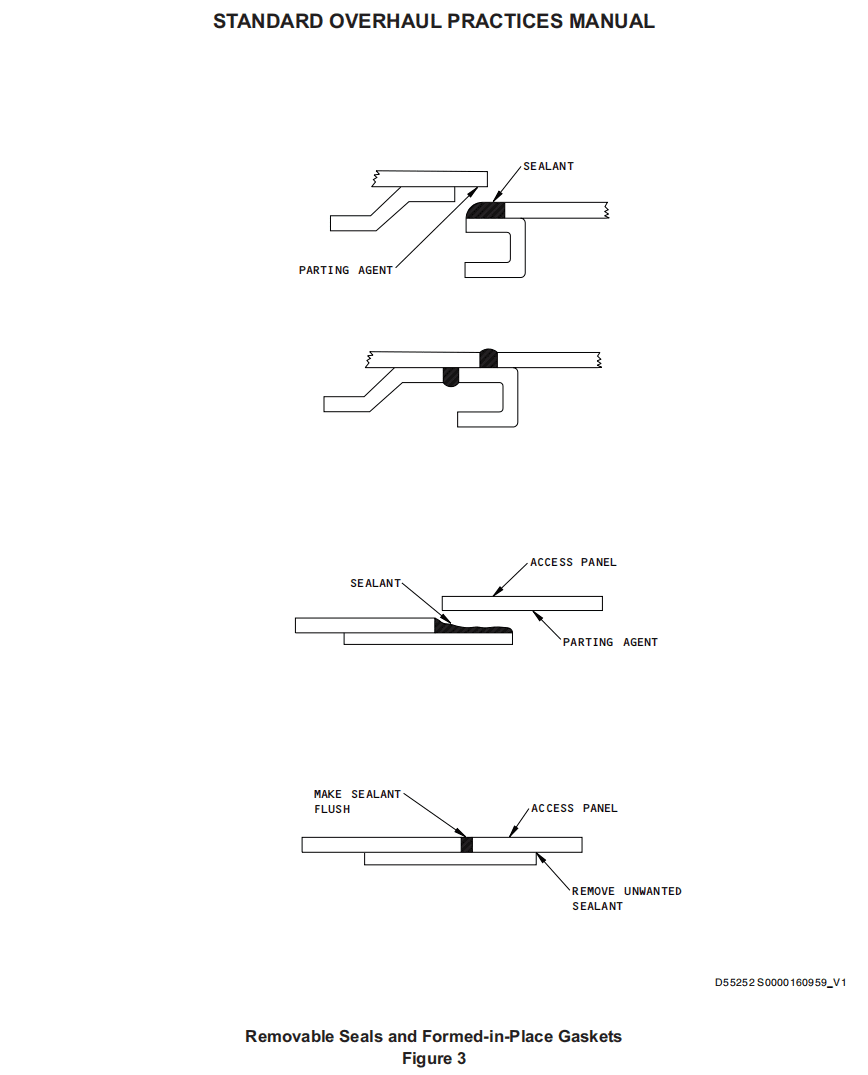
G. Removable Seals and Formed-in-Place Gaskets (Figure 3)
可拆卸密封件和成型垫片(图3)
(1) Be sure the two mating surfaces are clean.
确保两个配合表面干净。
(2) Apply a parting agent to one of the surfaces.
在其中一个表面涂上脱模剂。
(a) If one of the surfaces is acrylic, apply the agent to the acrylic surface.
如果其中一个表面是丙烯酸树脂,则将脱模剂涂在丙烯酸树脂表面。
(b) If the parting agent will be applied by spray, give protection to the adjacent surfaces. Be sure to clean away all overspray with solvent.
如果脱模剂将通过喷涂方式涂覆,则对相邻表面进行保护。确保用溶剂清除所有过喷。
(3) When the parting agent layer is dry to the touch, apply sealant to the other mating surface or on the layer of parting agent.
当脱模剂层摸起来变干时,在另一接合表面或脱模剂层上涂抹密封剂。
(4) If you disassemble the parts which have a removable seal between them, you must remove the sealant and the parting agent and start all over again.
如果拆卸的零件之间有可拆卸的密封件,则必须去除密封剂和脱模剂,然后重新开始。
(5) If you disassemble the parts which have a formed-in-place gasket after the sealant is cured, the sealant can stay, but you must remove the parting agent and apply new parting agent.
如果密封胶固化后,您要分解带有现成垫片的零件,则可以保留密封胶,但必须清除脱模剂并涂抹新的脱模剂。
H. Low Adhesion Sealing
低粘附密封
(1) This procedure is specified when corrosion resistance and parts removal are important and subsequent fillet sealing is not necessary.
当零件的耐腐蚀性和拆卸性很重要,且无需后续圆角密封时,应采用此方法。
(2) Unless the overhaul instructions are different, use PR-1405G sealant. This sealant is a two-part paste of a polysulfide polymer and has corrosion-resistant properties. The sealant will stay tacky and will not cure. It has a 24-hour application time and a 4320-hour (180-day or 6-month) squeeze-out time.
除非大修说明另有规定,否则请使用 PR-1405G 密封胶。这种密封胶由多硫化物聚合物制成,分为两部分,具有耐腐蚀性。密封胶会保持粘性,不会固化。它的适用期为 24 小时,挤出时间为 4320 小时(180 天或 6 个月)。
(3) Usually the PR-1405G sealant is supplied in a kit where the two parts are pre-measured. If you use only part of a kit, mix 3 weight parts of Part A with 100 weight parts of Part B. Fully mix the two parts together and be sure to include the material around the sides and the bottom of the mixing container.
PR-1405G密封胶通常以套件形式提供,其中两部分已预先测量好。如果您只使用套件的一部分,按重量比将3份的A部分与100份的B部分混合。将两部分充分混合在一起,确保混合容器侧边和底部材料也混合在一起。
10. PREPACK SEALING 预包装密封
A. Fill all of the void or cavity with sealant until no more sealant will go in and there will be sealant squeezed out when the parts are assembled.
用密封胶填充所有空隙或空腔,直到不再有密封胶流入,并且在组装零件时会有密封胶挤出。
B. Put the parts together. Install fasteners on the two sides of the void or cavity to hold the parts together before the end of the application time or squeeze-out time of the sealant. Temporary fasteners can be used to hold the parts together with the correct force until the permanent fasteners are installed.
将零件组装在一起。在密封胶的涂抹时间或挤出时间结束前,在空隙或空腔的两侧安装紧固件,将零件固定在一起。在安装永久性紧固件之前,可以使用临时紧固件以适当的力将零件固定在一起。
11. INJECTION SEALING 注射密封
A. When the seal must be continuous or block a passage or hole, the holes and joggles must be fully filled with sealant, as shown in Figure 4.
当密封必须连续或阻挡通道或孔时,孔和凹槽必须用密封胶完全填充,如图4所示。
B. When an opening is to be closed to hold up a fillet seal, it is not necessary to inject sealant to the full depth of the opening.
当需要关闭开口以支撑圆角密封时,不必将密封胶注入到开口的整个深度。
C. When a seal is made at the bottom of a slot, apply the sealant to fill and touch all surfaces of the bottom and sides of the slot, as shown.
当在槽底部进行密封时,如图所示,涂抹密封胶以填充并接触槽底部和侧面的所有表面。
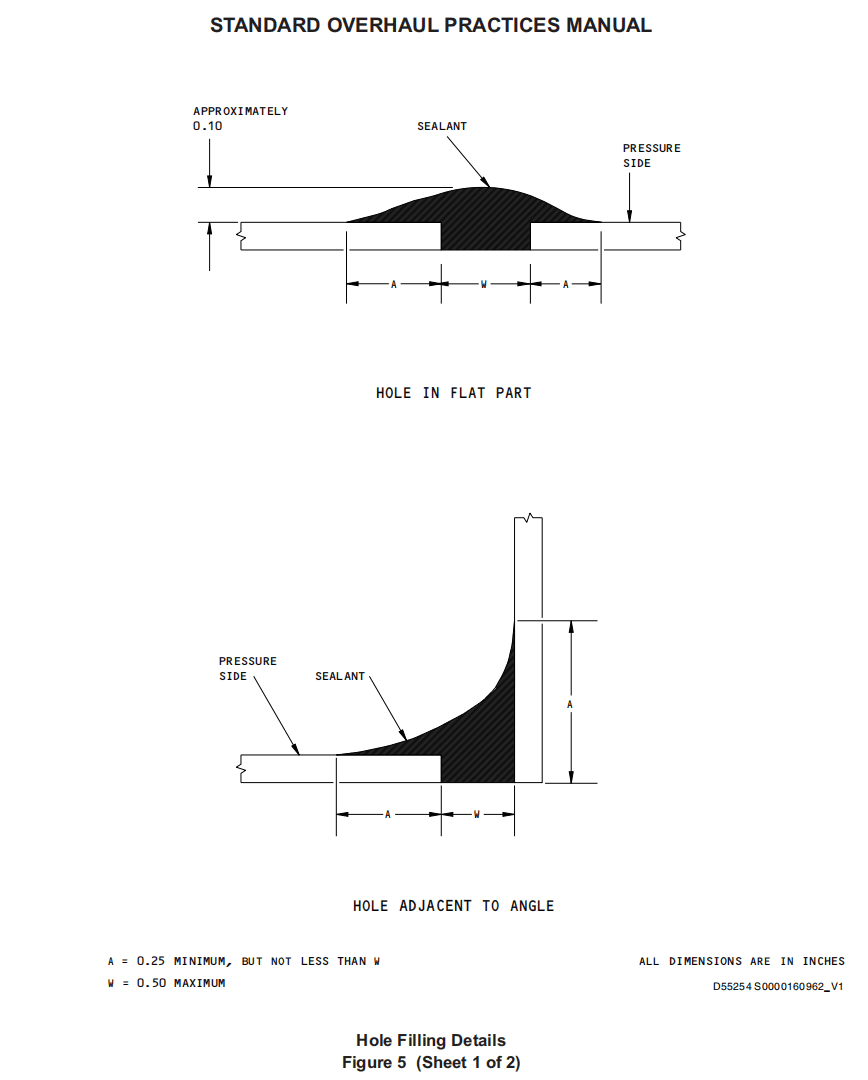
12. HOLE FILLING 填孔
A. Push the sealant tightly into the space to be filled. Do this from the pressure side of the hole, unless specified by the overhaul instructions. Make the sealant into a smooth fillet on the adjacent surfaces, as shown in Figure 5.
将密封胶紧紧的压入待填充的空间。除非大修说明另有规定,否则应从孔洞的压力侧进行填充。如图5所示,在相邻表面形成光滑的圆角。
B. If the holes or slots to be filled are large, you can use masking tape to make a temporary bottom. Be sure to remove the tape after the sealant is cured. Clean off all tape adhesive as specified in Paragraph 6.
如果需要填充的孔或缝隙较大,可以使用遮蔽胶带临时做一个底(封住底部)。确保在密封胶固化后去除胶带。按照第6段所述清除所有胶带粘合剂。
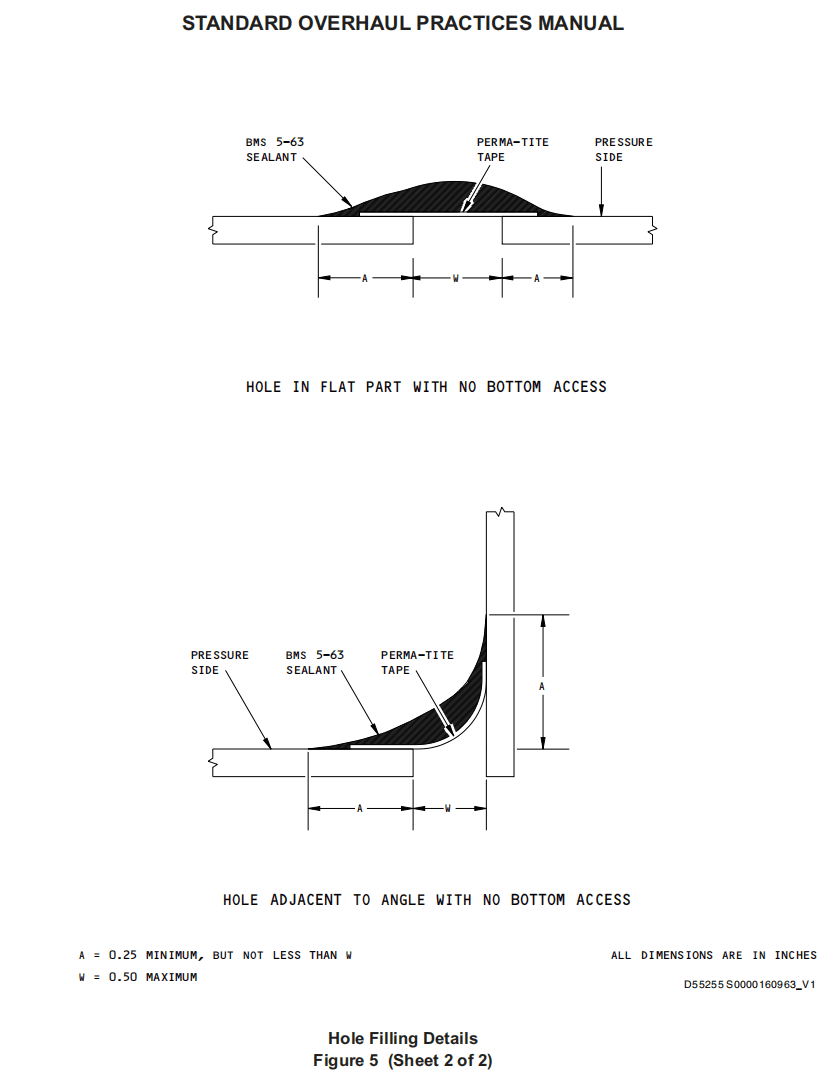
C. If you cannot get access to the rear of holes or gaps, you can use Perma-Tite tape and a high-temperature silicone sealant, as shown, unless these holes are in the firewall.
如果无法接触到孔或缝隙的后部,可以使用Perma-Tite胶带和高温硅酮密封胶,如图所示,除非这些孔位于防火墙内。
D. Fill the tool holes and coordination holes that do not have soft rivets installed in them. In absolute sealed areas, apply a layer of sealant over the soft rivets.
填充其中没有安装软铆钉的工具孔和配合孔。在绝对密封的区域,在软铆钉上涂一层密封胶。

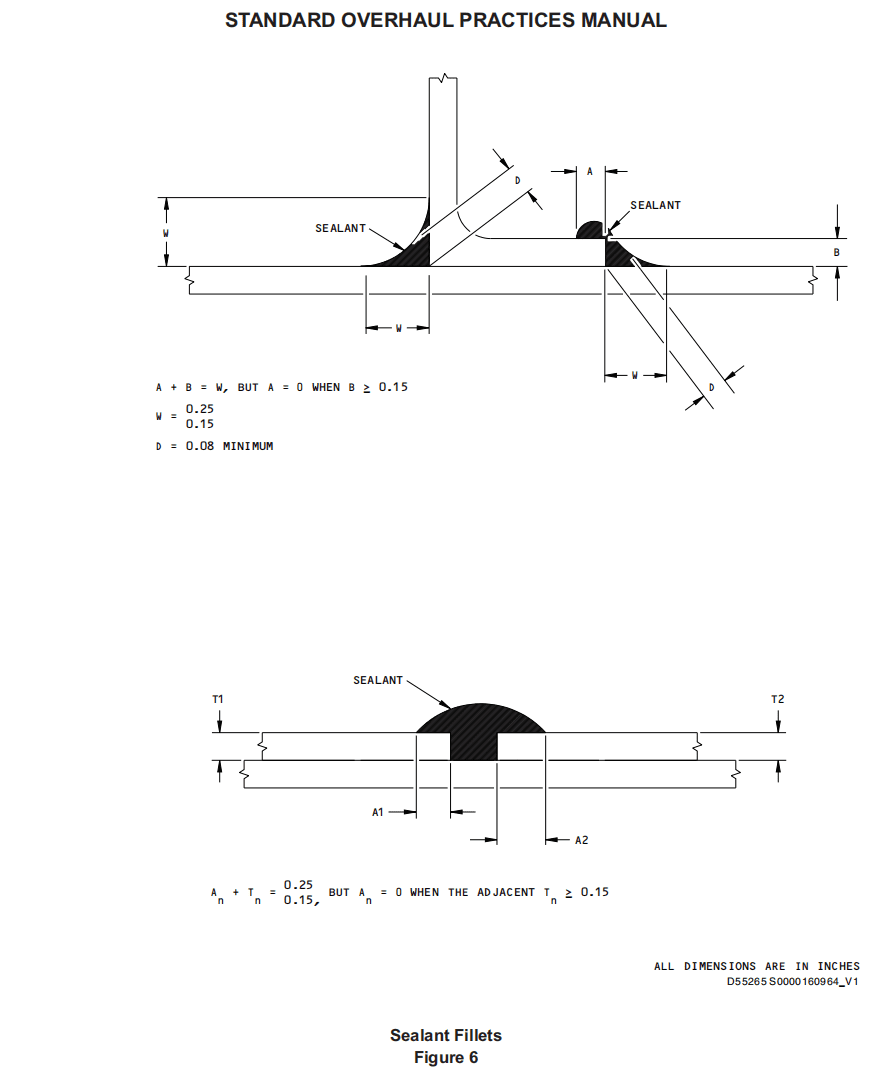
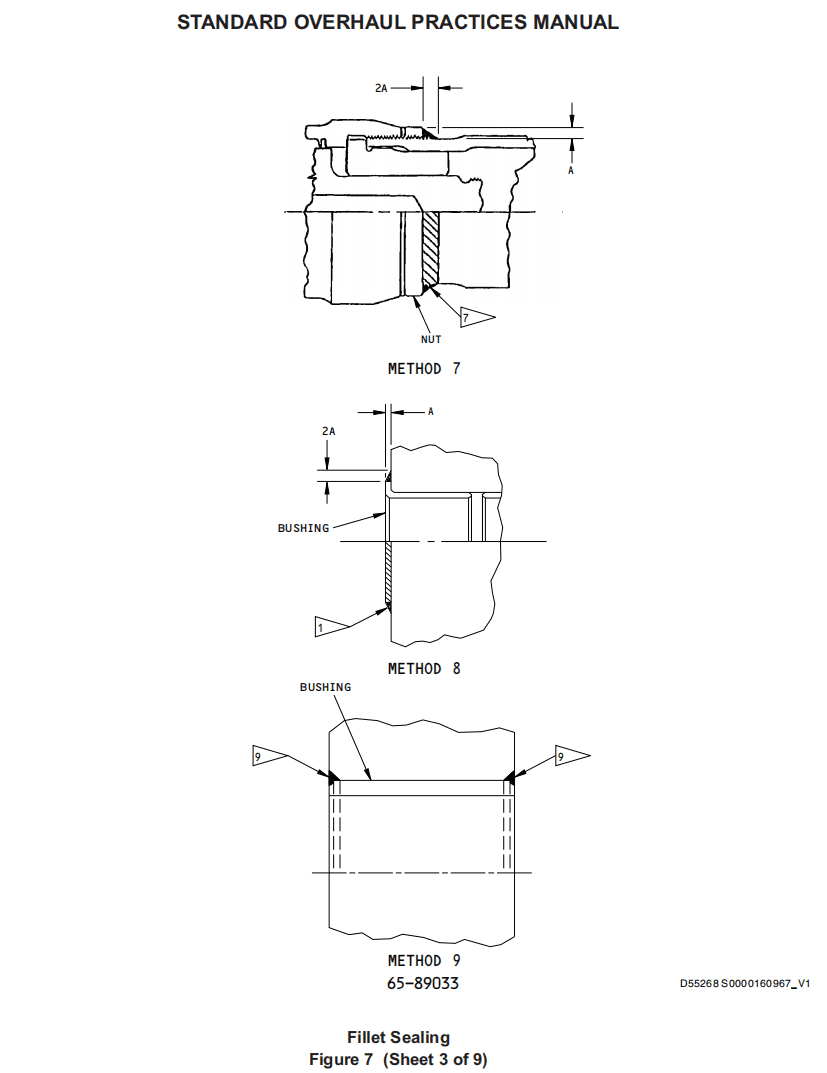
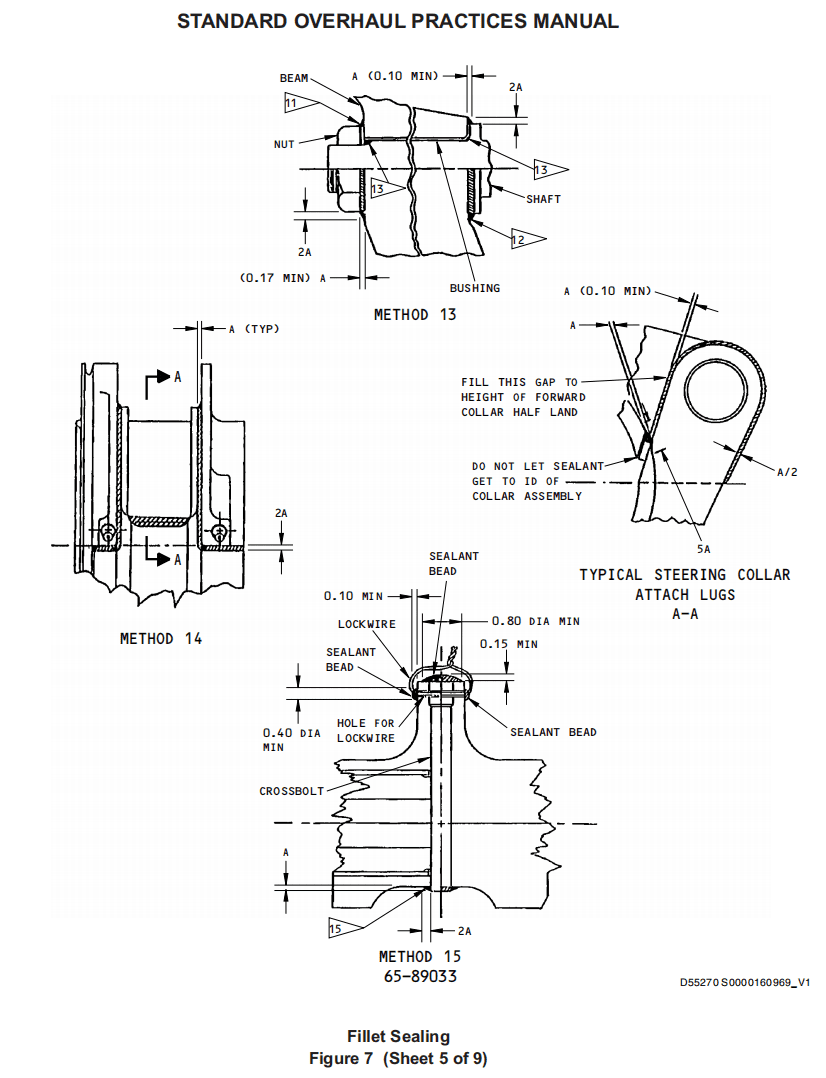
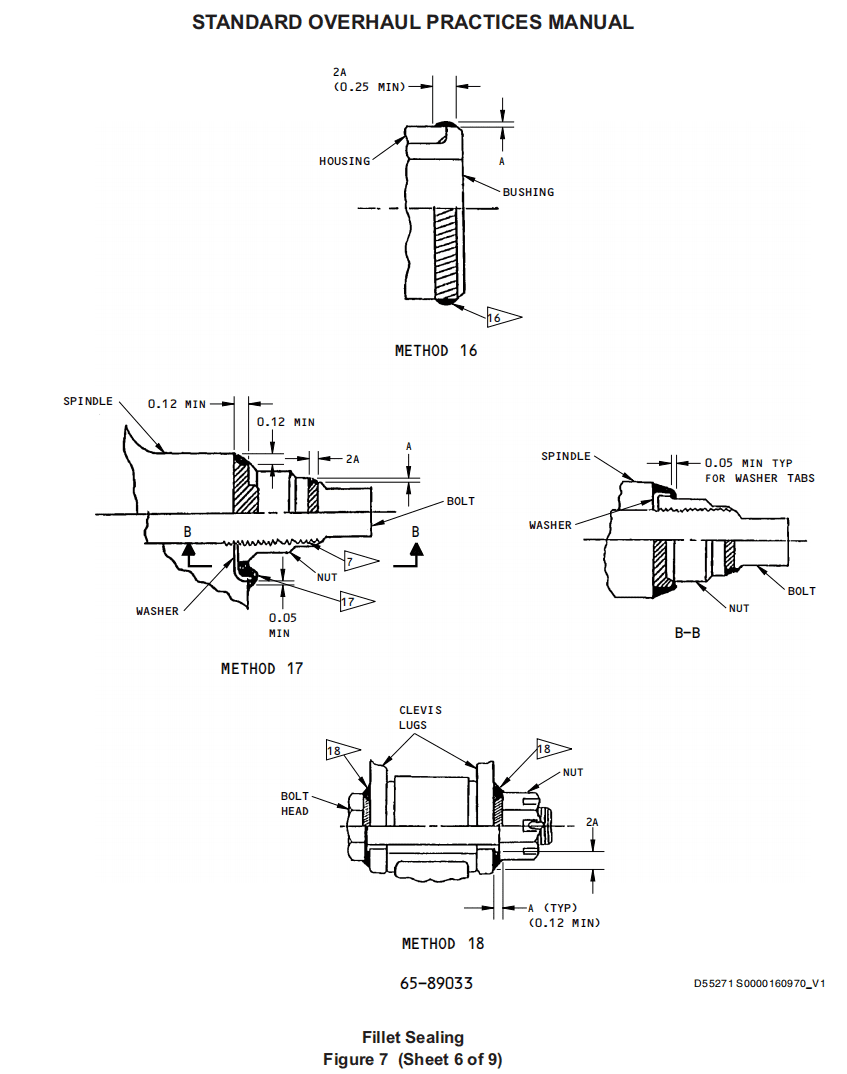
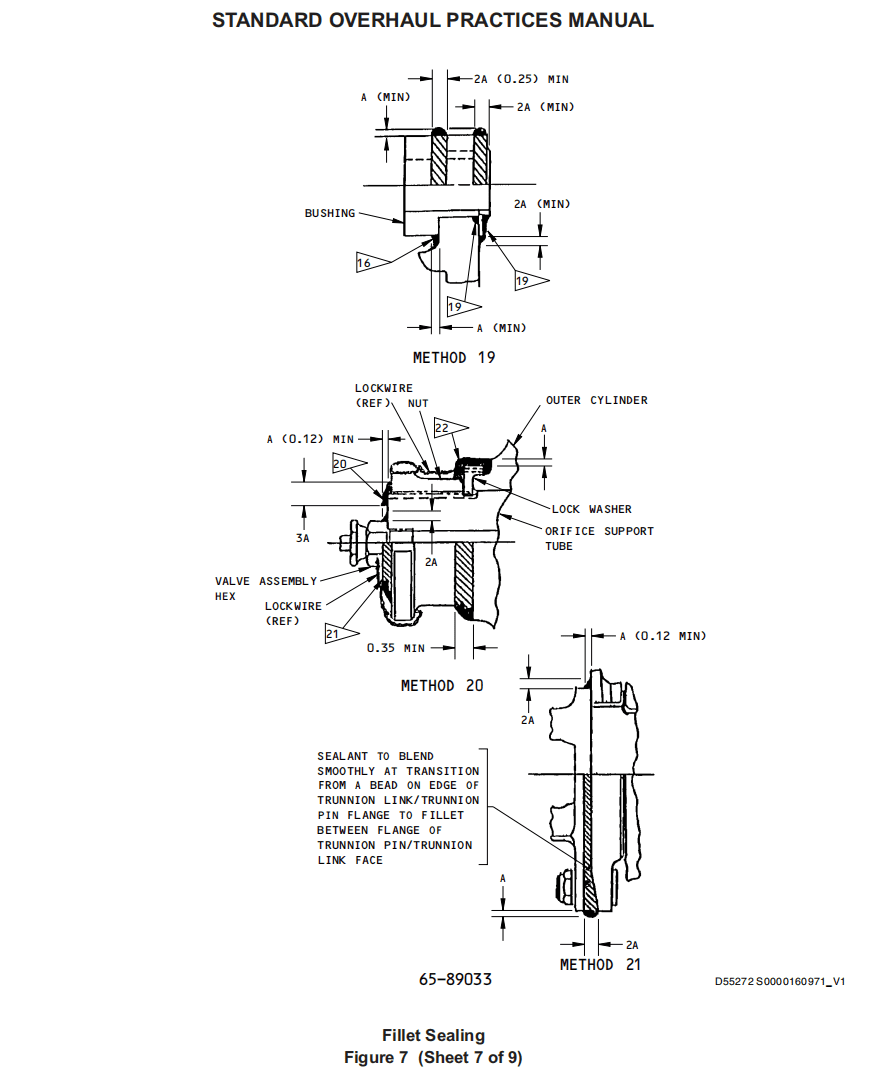
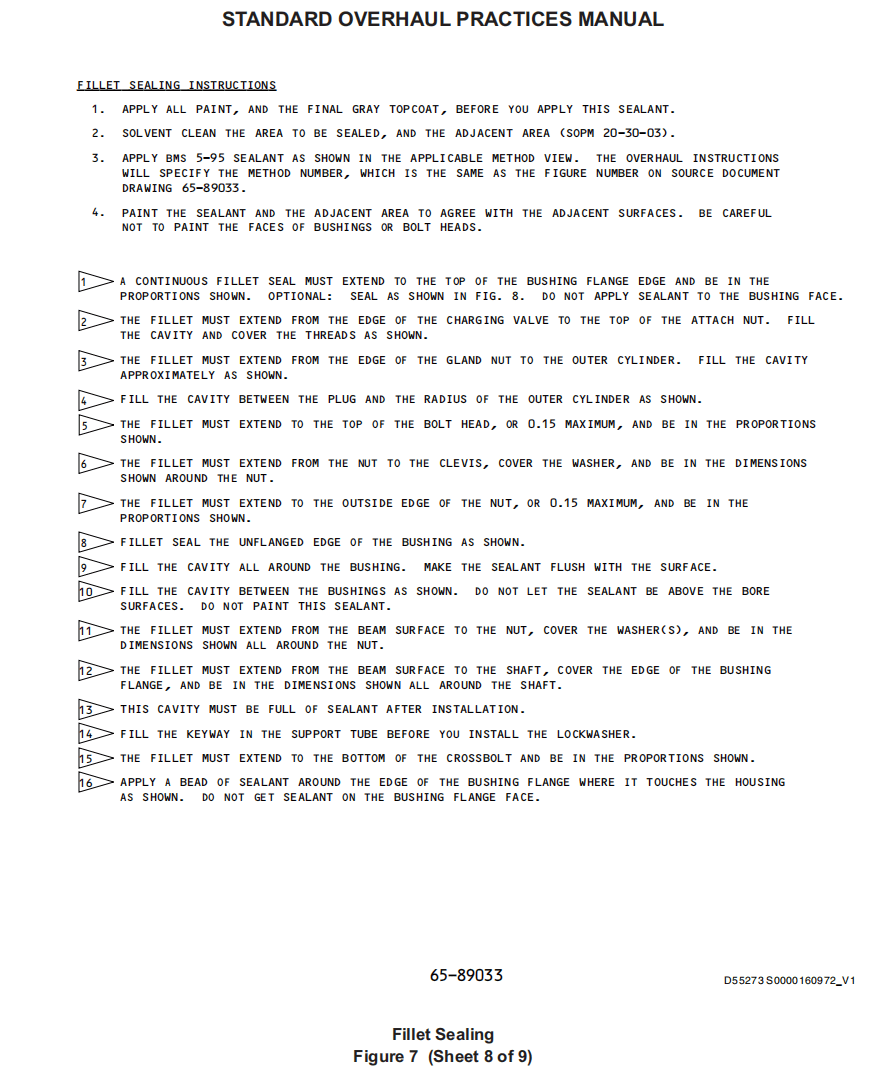
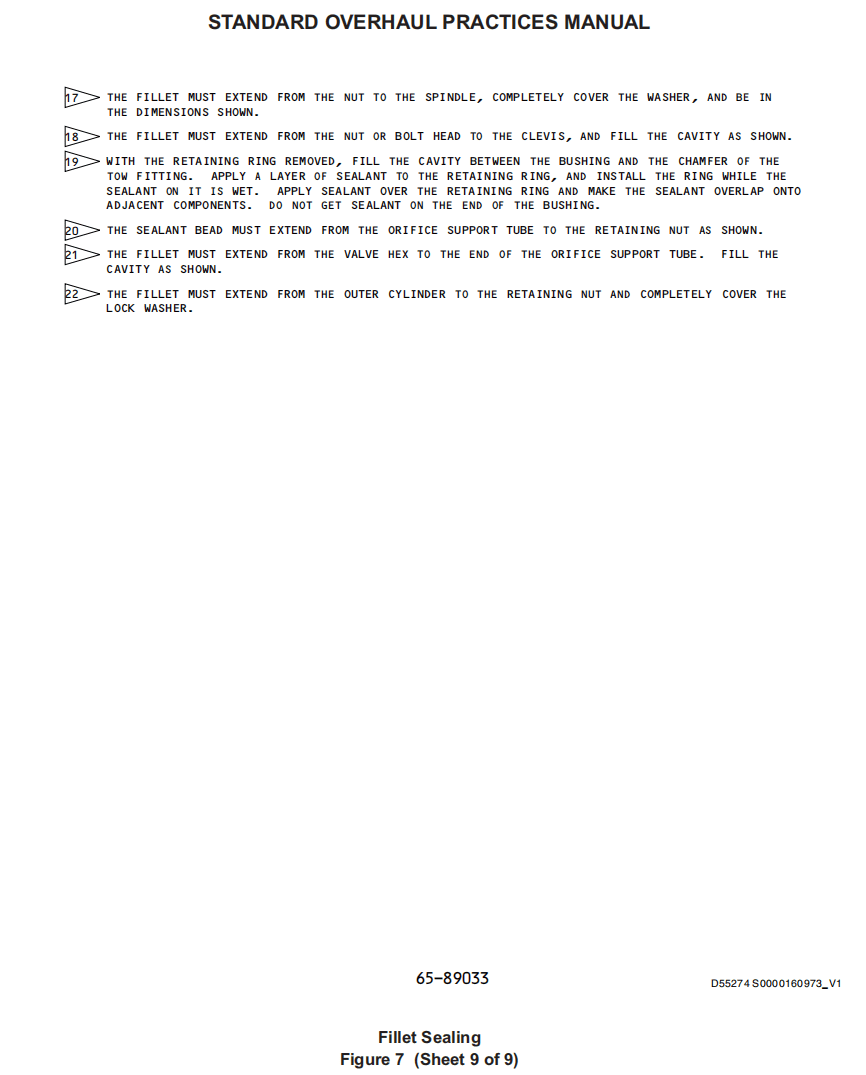
13. FILLET SEALING 圆角密封
A. Apply sealant with a Semco-type sealant gun or equivalent. Make the sealant fillets smooth with plastic or metal tools or a brush as shown in Figure 6, Figure 7, Figure 8.
使用Semco类型密封胶枪或类似工具涂抹密封胶。如图6、图7、图8所示,用塑料或金属工具或刷子使密封胶圆角光滑。
(1) To help prevent air pockets as you apply the sealant, point the nozzle tip into the seam, keep it nearly perpendicular to the line of travel, and push a bead of sealant ahead of the nozzle tip.
为防止在涂抹密封胶时出现气泡,请将喷嘴对准接缝,使其与行进路线保持几乎垂直,并在喷嘴前端挤出密封胶。
(2) To help prevent a bond between sealant and tools, wet the tools with a clean solution of 1 volume part of isopropyl alcohol to 5 or 6 volume parts of distilled water. Use only small quantities, and do not mix this into the sealant.
为防止密封胶与工具粘结,可用1体积异丙醇与5或6体积蒸馏水的混合溶液润湿工具。用量要少,且不要将其混入密封胶中。
B. If you stopped during the fillet seal procedure, continue as follows:
如果在圆角密封过程中停止,请按以下步骤继续操作:
(1) If within the sealant application time, you can remove or add sealant, or adjust the shape of the sealant fillet.
如果在密封胶适用时间内,您可以移除或添加密封胶,或调整密封胶圆角的形状。
(2) If the sealant application time is expired, or if the sealant is cured for 24 hours or more, you can continue to apply sealant to complete the fillet.
如果密封胶适用时间已过,或者密封胶固化24小时或更长时间,您可以继续涂抹密封胶以完成圆角。
C. If the fillet of sealant will be applied over cured structural adhesive such as BMS 5-42, BMS 5-51, BMS 5-70 or BMS 5-101, be sure to remove all adhesive which did not bond to the metal or composite surface. Use an approved scraper to prevent damage to the surface. If you cannot easily remove the adhesive, let it stay on the surface.
如果密封胶填缝将涂覆在固化结构胶(如BMS 5-42、BMS 5-51、BMS 5-70或BMS 5-101)上,请务必清除所有未粘附在金属或复合材料表面的胶粘剂。使用批准的刮刀,防止损坏表面。如果无法轻松清除胶粘剂,则让其留在表面上。
D. These sealants can be applied over cured BMS 8-45 tamper-proof inspection putty: BMS 5-45, BMS 5-95 and BMS 5-142.
这些密封剂可以涂在固化后的BMS 8-45防篡改检查油灰上:BMS 5-45、BMS 5-95和BMS 5-142。
E. For BMS 5-63, Type 1 or 2 sealant, refer to BAC5000, par. 8.5 for instructions.
有关BMS 5-63、类型1或2密封剂的使用说明,请参阅BAC5000第8.5段。
F. If the overhaul instructions specify fillet seals as specified in Boeing drawings 65-89033 or 69B13372, see Figure 7 and Figure 8 for instructions.
如果大修说明中指定使用波音图纸 65-89033 或 69B13372 中规定的角密封,请参阅图 7 和图 8 获取说明。


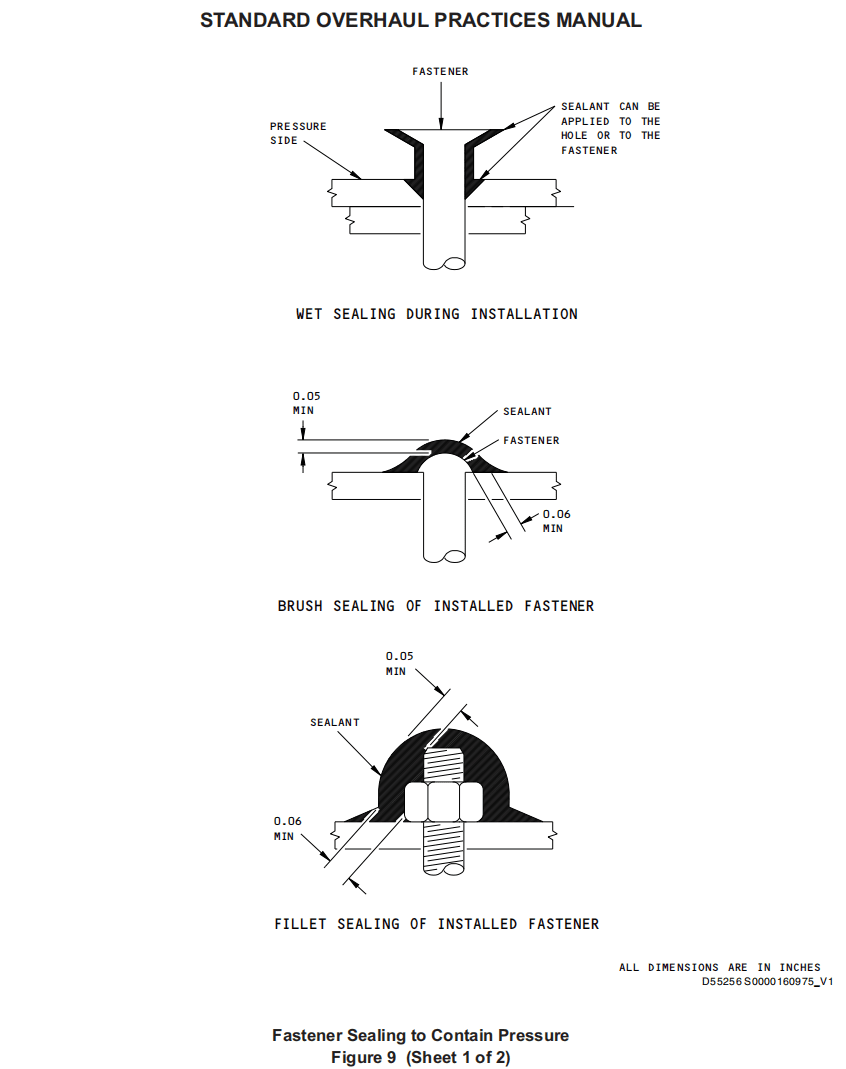
14. FASTENER SEALING TO CONTAIN PRESSURE 承受压力的紧固件密封
A. Install fasteners through a faying surface seal during the application time or squeeze-out time of the sealant. Refer to Figure 9.
在密封胶的涂抹时间或挤出时间内,通过接合表面密封安装紧固件。请参阅图 9。
NOTE: Refer to other specific maintenance instructions (i.e. AMM, SRM, CMM, SB, etc.) for fastener installation in the fuel tank.
注意:有关油箱内紧固件的安装,请参阅其他特定维护说明(i.e. AMM, SRM, CMM, SB, etc.)。
B. If fasteners must be installed through a faying surface seal after the application time or squeeze-out time is expired, or if there is no faying surface seal, use one of these procedures, as specified by the overhaul instructions:
如果必须在涂抹时间或挤出时间结束后通过接合表面密封安装紧固件,或者如果没有接合表面密封,请按照大修说明的规定使用以下方法之一:
(1) Method 1 — Apply sealant to the fastener or hole at installation, as shown. The sealant which squeezes out must be continuous all around the fastener.
方法 1——如图所示,在安装时在紧固件或孔上涂抹密封胶。挤出的密封胶必须连续覆盖紧固件的整个表面。
(2) Method 2 — With a brush, apply a Class A sealant to the installed fastener, or apply a fillet of Class B sealant around the installed fastener, as shown.
方法 2——如图所示,用刷子在已安装的紧固件上涂抹 A 级密封胶,或在已安装的紧固件周围涂抹一圈 B 级密封胶。
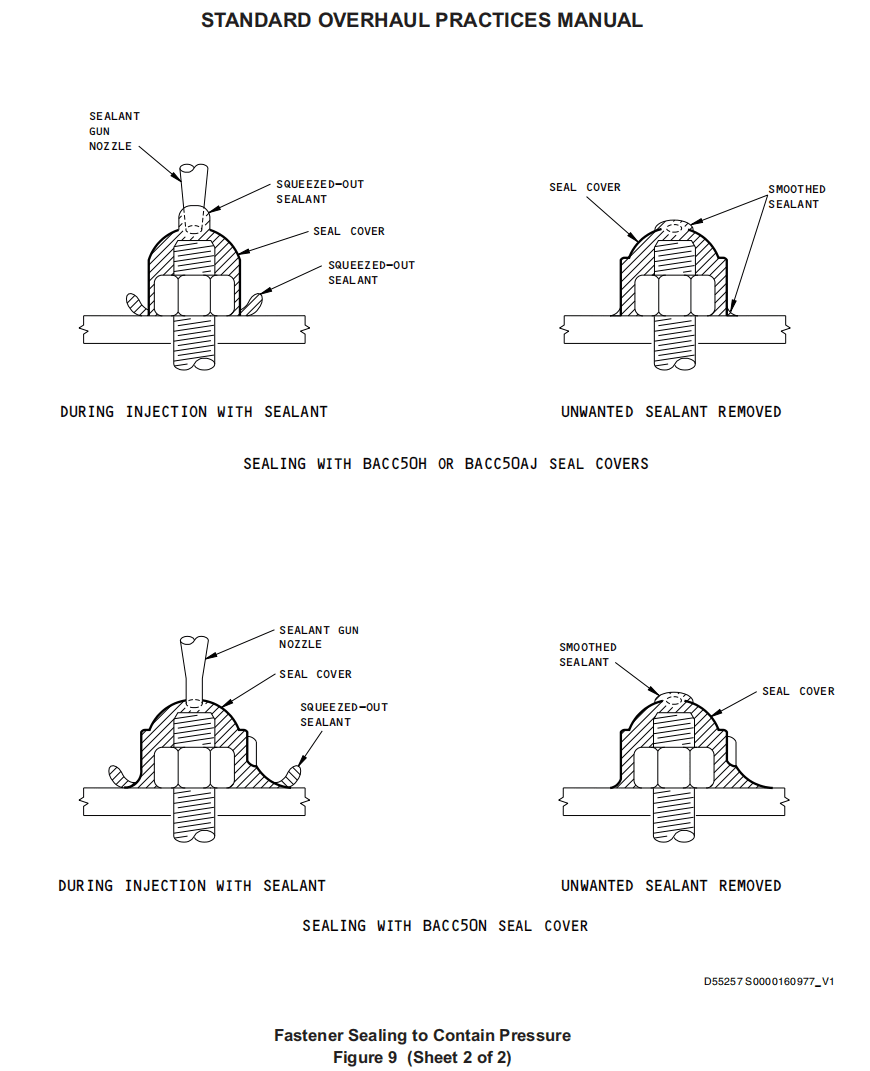
(3) Method 3 — Use BACC50H metal seal covers or BACC50AJ molded polysulfide seal caps.
方法 3——使用 BACC50H 金属密封盖或 BACC50AJ 模压聚硫密封盖。
(a) BACC50H seal covers
BACC50H 密封盖
1) Put the cover on the fastener.
将盖子放在紧固件上。
2) Inject sealant into the cover as shown.
如图所示将密封胶注入盖子。
3) Remove unwanted sealant and make the edges smooth, as shown.
去除多余的密封胶,使边缘光滑,如图所示。
(b) BACC50AJ seal caps
BACC50AJ 密封盖
1) Be sure the cap does not have release agent in it. If necessary, clean the agent off with a solvent from the list in Paragraph 6.A.(1).
确保盖子中没有脱模剂。如有必要,请使用第 6.A.(1) 款列出的溶剂清除脱模剂。
2) Fill the cap with sealant.
在盖子上填充密封胶。
3) Put the cap down on the fastener and push it down until the flange of the cap touches the structure. Make sure the sealant comes out all around the base of the cap and from the hole in the top of the cap.
将盖子放在紧固件上,向下压,直到盖子的法兰接触到结构。确保密封胶从盖子底部和顶部的小孔流出。
4) Hold the cap in position. Remove unwanted sealant, and make the edges of the sealant smooth all around the cap, as shown.
将盖子固定到位。去除不需要的密封胶,并使密封胶的边缘在盖子周围光滑,如图所示。
15. CORROSION PROTECTION SEALING 防腐密封
NOTE: This procedure could be specified as the Special Sealing Method for Corrosion Protection.
注意:此程序可指定为防腐专用密封方法。
A. Faying surface seals — Refer to Paragraph 9.
接合面密封——参考第9段。
B. Injection seals — Refer to Paragraph 11.
注射密封——参考第11段。
C. Fillet seals — Refer to Paragraph 13.
圆角密封——参考第13段。
D. Fastener sealing
紧固件密封
(1) Installation of fasteners with wet sealant
使用湿密封剂安装紧固件
(a) Hole preparation
孔的制备
1) When you drill holes for fasteners, use only those lubricants approved by BAC5008 (for metals) and BAC5063 (for composites).
当为紧固件钻孔时,仅使用BAC5008(用于金属)和BAC5063(用于复合材料)批准的润滑剂。
2) After you make the holes and countersinks, remove contamination such as dust, chips and filings.
在完成钻孔和打埋头孔后,清除灰尘、碎屑和锉屑等污染物。
3) If you used a lubricant when you drilled the hole, clean the lubricant away as specified in Paragraph 6.
如果在钻孔时使用了润滑剂,请按照第6段的规定清除润滑剂。
4) Clean the surfaces to be sealed, and the countersink, but not the hole itself, as specified in Paragraph 6.
按照第6段的规定,清洁待密封表面和埋头孔,但不要清洁孔本身。
5) If BMS 5-63 sealant will be used, apply a thin layer of BMS 5-63 primer to all surfaces which will touch the sealant. This primer is not necessary on the fastener or washer surfaces. Let this primer dry a minimum of 60 minutes before you install the fasteners with the sealant. BMS 10-11, Type 1 primer can be used as an alternative, but it must be fully cured before you install the fasteners with the sealant. Uncured BMS 10-11, Type 1 primer could cause a problem with the cure of the BMS 5-63 sealant.
如果使用BMS 5-63密封剂,请在所有与密封剂接触的表面涂上一层薄薄的BMS 5-63底漆。在紧固件或垫圈表面不需要涂底漆。在用密封胶安装紧固件之前,请确保底漆至少干燥60分钟。BMS 10-11,类型1底漆可作为替代品使用,但在用密封胶安装紧固件之前必须完全固化。未固化的BMS 10-11,类型1底漆可能会影响BMS 5-63密封胶的固化。
6) BMS 10-11, Type 1 primer can be applied as a base coat for the other sealants, if necessary.
如有必要,BMS 10-11,类型1底漆可作为其他密封胶的底漆。
(b) Apply the sealant by Method 1, 2, or 3 as specified by the overhaul instructions. If the method is not specified, use Method 1.
根据大修说明中指定的方法1、2或3涂抹密封胶。如果未指定方法,则使用方法1。
1) Method 1 — Sealant under the head of the fastener
方法1——紧固件头下的密封胶
a) Apply a sufficient quantity of sealant to make a layer on all surfaces and countersinks under the fastener head.
在紧固件头部的所有表面和埋头孔上涂抹足够的密封胶,形成一层。
b) Install the fasteners during the squeeze-out life of the sealant.
在密封胶挤出期内安装紧固件。
c) Make sure the sealant comes out as a continuous bead all around the fastener head.
确保密封胶在紧固件头部周围形成连续的密封胶条。
d) Remove unwanted sealant.
清除多余的密封胶。
2) Method 2 — Sealant under the head and on the shank of the fastener.
方法 2——在紧固件头部和杆部下方涂抹密封胶。
a) Threaded fasteners not used with self-sealing collars or nuts:
螺纹紧固件未使用自密封环或螺母:
<1> Apply sealant to the fastener shank and threads. Also, apply sealant to the hole as necessary to help make sure there will be continuous squeeze-out around the fastener head.
在紧固件杆和螺纹上涂抹密封胶。此外,如有必要,在孔内涂抹密封胶,以确保紧固件头部周围有连续的挤出。
<2> If washers are used below the fastener head, apply sealant to one or both sides of the washers as necessary to get continuous squeeze-out.
如果紧固件头部下方使用垫圈,则根据需要在一侧或两侧涂抹密封胶,以实现连续挤出。
<3> Make sure that the sealant squeeze-out between the fastener head and the part is continuous. Do the installation process again if the squeezeout is not continuous.
确保密封胶在紧固件头和零件之间的挤出是连续的。如果挤出不连续,请重新进行安装。
<4> If washers are used below the fastener head, make sure the sealant squeeze-out is continuous at all interfaces below the fastener head (e.g., between the fastener head and the washer, between washers, and between the washer and the part). Do the installation process again if the squeeze-out is not continuous.
如果垫圈用于紧固件头部下方,请确保密封胶在紧固件头部下方的所有接口(例如紧固件头部和垫圈之间、垫圈之间以及垫圈和零件之间)连续挤出。如果密封胶没有连续挤出,请重新进行安装。
<5> Remove unwanted sealant.
清除多余的密封胶。
b) Threaded fasteners used with self-sealing collars or nuts — Apply sealant only to the shank. Keep sealant off the threads, but signs of sealant are acceptable. Then install the bolt into the hole and install the nut or collar.
带自密封环或螺母的螺纹紧固件——仅在杆部涂抹密封胶。不要让密封胶接触到螺纹,但允许有密封胶痕迹。然后将螺栓安装到孔中,并安装螺母或环。
c) Lockbolts and other fasteners with annular grooves — Apply sealant only to the shank, 0.06 inch minimum thick. Do not apply sealant to the hole surfaces. Keep sealant away from the grooves. If necessary, wipe the grooves off before you swage the collar on the lockbolt. Sealant in the annular grooves will decrease the function of the fastener.
锁紧螺栓和其他带有环形凹槽的紧固件——仅在螺栓杆上涂抹密封胶,厚度至少为0.06英寸。不要在孔表面涂抹密封胶。密封胶不要接触凹槽。如有必要,在将锁紧螺栓上的锁紧环压入凹槽前,先擦去凹槽中的密封胶。环形凹槽中的密封胶会降低紧固件的功能。
d) A continuous bead of sealant must come out all around the fastener head. Remove unwanted sealant from flush fastener heads with a dry wiper, to make the squeezed-out sealant smooth with the fastener heads or the adjacent surface.
密封胶应连续地环绕在紧固件头部。用干刷子清除紧固件头部多余的密封胶,使挤出的密封胶与紧固件头部或相邻表面光滑。
3) Method 3 — Sealant under the fastener head, on the shank, and on the base of assembled hardware.
方法 3——密封胶位于紧固件头部下方、杆部以及组件底部。
a) Clean as specified in Paragraph 6. the surfaces to get the sealant, and the countersinks, but not the holes.
按照第6段所述清洁表面,以便挤出密封胶,并清洁埋头孔,但不要清洁孔洞。
b) Apply a layer of sealant to the shank and threads of the fastener.
在紧固件的杆部和螺纹上涂抹一层密封胶。
c) Install the fastener in the hole. More sealant can be applied to the shank if necessary to get a good bead of sealant around the base of the related washer. Or sealant can be applied under the washer before installation.
将紧固件安装到孔洞中。如有必要,可在杆部上涂抹更多密封胶,以便在相关垫圈底部形成良好的密封胶条。或者,可在安装前在垫圈下方涂抹密封胶。
d) Install the collar or the nut and tighten it to the specified torque during the application time of the sealant.
安装轴环或螺母,并在密封胶固化期间将其拧紧至规定的扭矩。
e) Make sure there is a continuous bead of squeezed-out sealant around the fastener head, the base of the collar or nut, and the washer, if one is included.
确保在紧固件头部、轴环或螺母底部以及垫圈(如有)周围挤出连续的密封胶。
f) Remove unwanted sealant from flush fastener heads with a dry wiper to make the sealant smooth with the fastener head or the adjacent surface. Do not remove the squeezed-out sealant from the base of the collar or nut or the washer until after the quality-control inspection.
用干燥的刷子清除齐平紧固件头部多余的密封胶,使密封胶与紧固件头部或相邻表面平滑。在质量控制检查之前,不要清除从轴环或螺母或垫圈底部挤出的密封胶。
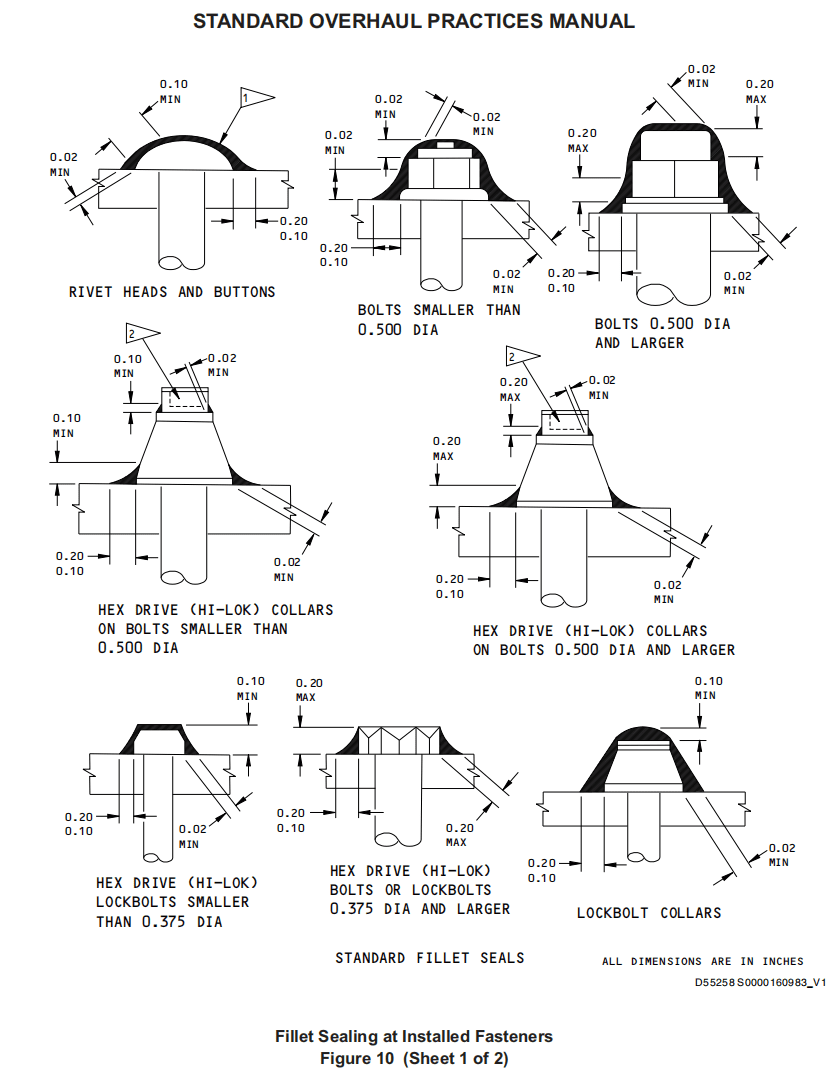
(2) Fillet sealing around the edge of installed fasteners (Figure 10).
安装紧固件边缘的圆角密封(图10)。
NOTE: Refer to other specific maintenance instructions (i.e. AMM, SRM, CMM, SB, etc.) for fastener installation in the fuel tank.
注意:有关油箱内紧固件的安装,请参阅其他特定维护说明(即AMM、SRM、CMM、SB等)。
(a) Use only Class B or Class A (brush-on) sealants.
仅使用B级或A级(刷涂)密封剂。
(b) Apply sealant to make fillets as shown. Use the standard fillet dimensions unless the overhaul instructions tell you to use the reduced fillet dimensions.
按照所示涂上密封胶,形成圆角。除非大修说明要求使用缩小后的圆角尺寸,否则应使用标准圆角尺寸。
(c) Brush marks are acceptable if the sealant dimensions are within the specified limits.
如果密封胶尺寸在规定的范围内,则允许出现刷痕。
(3) Installation of BACB30PT fasteners.
BACB30PT紧固件的安装。
(a) Remove chips, filings and other unwanted matter after the hole is made.
钻孔后,清除碎屑、锉屑和其他不需要的物质。
(b) If necessary, apply BMS 10-11, Type 1 primer as a base layer for the sealant.
如有必要,涂覆BMS 10-11,类型1底漆作为密封胶的基层。
(c) Apply BMS 5-95, Class B or C sealant to the countersink surface with an injection tool. Make a continuous ring of the sealant in the countersink area.
用注射工具将BMS 5-95,B类或C类密封胶涂覆在埋头孔表面。在埋头孔区域形成连续的密封胶环。
(d) Install the fastener during the squeeze-out life of the sealant.
在密封胶挤出寿命内安装紧固件。
(e) Remove unwanted sealant with a wiper wet with a mixture of equal volume parts of methyl ethyl ketone and toluene, or with a solvent from the list in Paragraph 6.A.(1). Use only a small amount of solvent. Then wipe dry with a dry wiper.
用蘸有等体积甲乙酮和甲苯混合物的湿刷子,或用第6.A.(1)段所列溶剂清除多余的密封剂。只使用少量溶剂。然后用干刷子擦干。
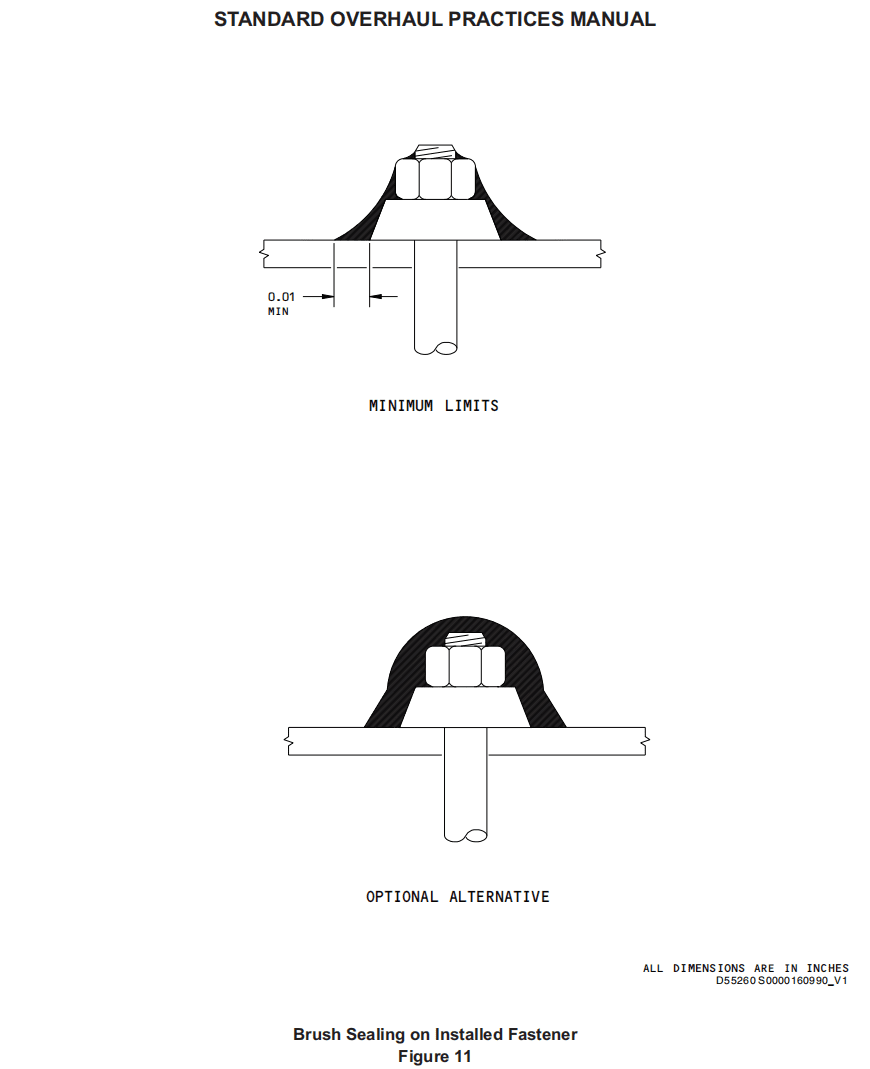
(4) Brush sealing over installed fastener threaded ends and mating components (Figure 11)
在已安装的紧固件螺纹端和配合部件上刷密封剂(图11)
NOTE: Refer to other specific maintenance instructions (i.e. AMM, SRM, CMM, SB, etc.) for fastener installation in the fuel tank.
注意:有关油箱内紧固件的安装,请参阅其他特定维护说明(即AMM、SRM、CMM、SB等)。
(a) Unless the overhaul instructions are different, use this special mix of sealant and solvent; of sealant 1) or 2) plus 12 percent by weight maximum of solvent 3):
除非大修说明有所不同,否则请使用这种特殊的密封剂和溶剂混合物;密封剂1)或2)加溶剂3)最多12%(重量比):
1) BMS 5-45, Class A, Grade 1
BMS 5-45,A级,1级
2) BMS 5-95, Type 1, Class B-2
BMS 5-95,类型1,B-2级
3) Equal volume parts methyl ethyl ketone and toluene
等体积的甲乙酮和甲苯
(b) With a brush, apply the sealant to make a visually smooth layer which completely cover these joints, as shown:
用刷子涂抹密封胶,使其形成一层视觉上平滑的涂层,完全覆盖这些接缝,如图所示:
1) Between the fastener threads and the nut or collar
紧固件螺纹和螺母或轴环之间
2) Between the nut or collar (and washers if used) and the structure
螺母或轴环(以及垫圈,如果使用)和结构之间
(c) As an alternative, you can completely cover all components as shown.
作为替代方案,您可以如图所示完全覆盖所有组件。
E. Sealing of bushings and bearings
衬套和轴承的密封
NOTE: Some components could have special standard sealing procedures in the overhaul instructions, such as those specified for landing gear bushings as specified in Boeing drawings 65-89033 or 69B13372.
注意:在大修说明中一些组件可能有特殊的标准密封程序,如波音图纸 65-89033 或 69B13372 中规定的起落架衬套。
(1) Fillet sealing without wet installation.
不湿式安装的圆角密封。
(a) Clean the surfaces of the bushing or bearing and the housing to get the sealant. Use the procedure of Paragraph 6. Clean the bearings with wipers lightly wet with a solvent from the list of Paragraph 6.A.(1).
清洁衬套或轴承和外壳表面,以便涂抹密封剂。按照第 6 段所述程序。用蘸有第 6.A.(1) 段所列溶剂的刷子轻轻擦拭轴承。
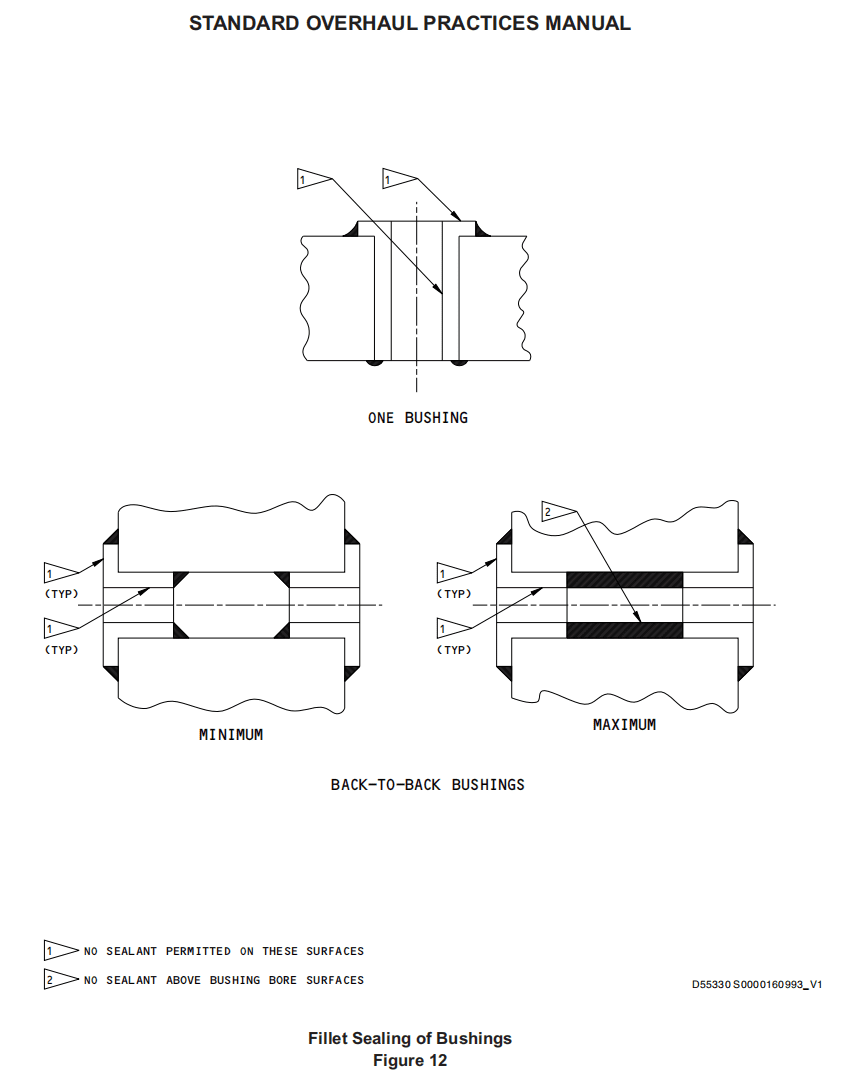
(b) Use the specified sealant to put fillet seals on the bushing ends as shown in Figure 12. Do not let sealant get on the flange faces or on the inner surfaces of the end without the flange.
使用规定的密封剂在衬套两端涂上圆角密封剂,如图 12 所示。不要让密封剂沾到法兰面或无法兰端面的内表面。
(2) Wet installation and sealing of bushings and bearings.
衬套和轴承的湿式安装和密封。
(a) Clean the surfaces of the bushing or bearing and of the housing to get the sealant. Use the procedure of Paragraph 6. Clean the bearings with wipers lightly wet with a solvent from the list of Paragraph 6.A.(1).
清洁衬套或轴承以及壳体的表面,以便涂抹密封剂。使用第6段中的程序。用蘸有第6.A.(1)段所列溶剂的刷子轻轻擦拭轴承。
(b) Apply a thin, continuous layer of the specified sealant to all surfaces of the mating hole in the housing. Apply a continuous bead of sealant to the surface of the housing which will be under the flange of the installed bushing. If the overhaul instructions do not give the sealant, refer to SOPM 20-50-03 for recommended sealants.
在壳体配合孔的所有表面涂抹一层薄薄的、连续的规定密封剂。在壳体表面涂抹连续的密封剂,该表面位于已安装衬套的凸缘下方。如果检修说明中没有给出密封剂,请参考 SOPM 20-50-03 了解推荐的密封剂。
(c) As applicable, install the bushing by the shrink fit or press fit procedure of SOPM 20-50-03 within the squeeze-out life of the sealant.
如有必要,在密封胶挤出寿命内,按照SOPM 20-50-03的收缩配合或压配合程序安装衬套。
(d) Make sure the squeezed-out sealant makes a continuous fillet which seals all along the joint between the bushing and the housing. If it does not, push the squeezed-out sealant to make the seal continuous. Add more sealant, if necessary.
确保挤出密封胶形成一个连续的圆角,密封衬套和壳体之间的所有连接处。如果没有,则挤压挤出密封胶,使其连续密封。如有必要,可添加更多密封胶。
(e) Remove sealant from the face of the bushing flange and the bore surfaces. Use a plastic or wooden scraper, or a wiper or cotton swab wet with a solvent from the list of Paragraph 6.A.(1).
清除衬套法兰表面和孔表面的密封胶。使用塑料或木制刮刀,或用第6.A.(1)段所列溶剂浸湿的刷子或棉签。
(f) When bushings are installed back-to-back as in Figure 12, seal the inside ends unless the gap between the bushings is used as a lubrication path. See Figure 12 for minimum and maximum limits for sealant in the gap.
当衬套背对背安装时(如图 12 所示),除非衬套之间的间隙用作润滑通道,否则应密封内侧末端。有关间隙中密封剂的最低和最高限制,请参见图 12。
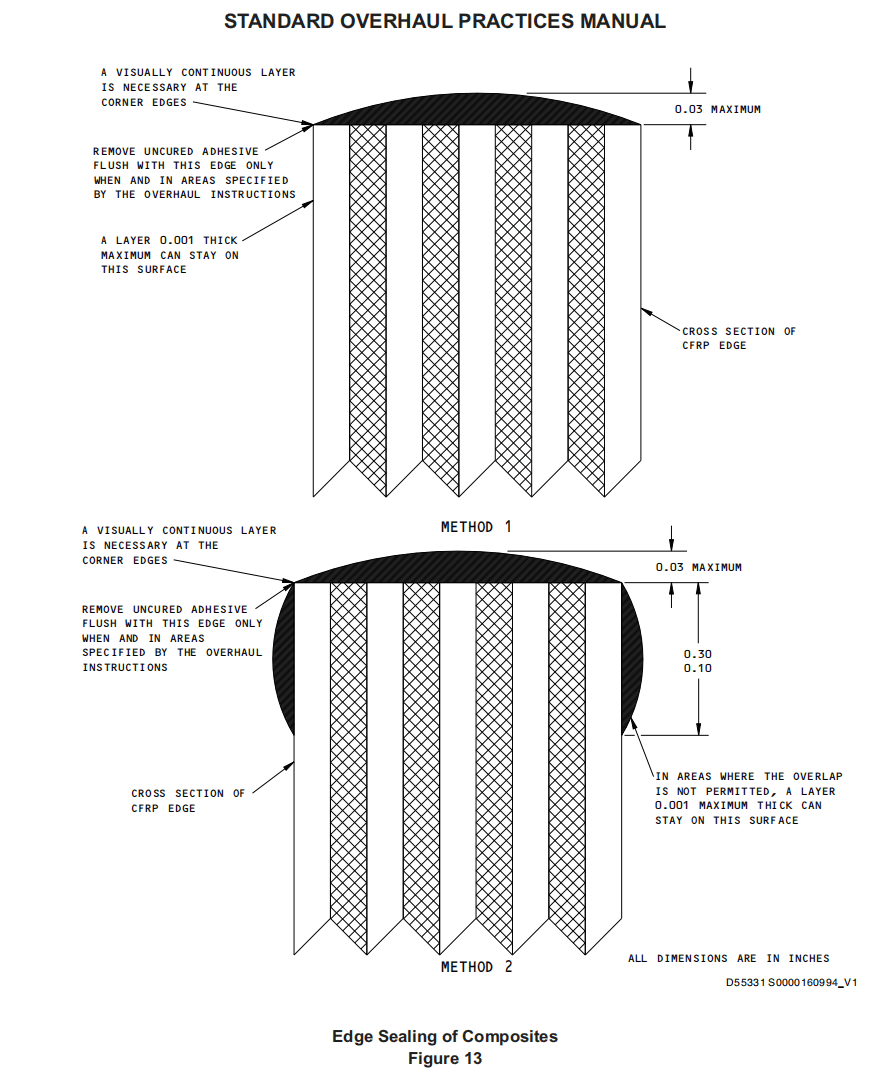
F. Edge Sealing of Components Adjacent to Aluminum Structure (Figure 13)
铝结构附近部件的边缘密封(图13)
(1) Clean as specified in Paragraph 6. the surfaces to get the sealant.
按照第6段的规定清洁表面,以便涂上密封胶。
(2) Apply the sealant by Method 1 or 2 as specified by the overhaul instructions. If the method is not specified, use Method 2.
按照大修说明中规定的方法1或方法2涂上密封胶。如果没有规定方法,则使用方法2。
(a) Method 1
方法 1
1) Apply BMS 5-92, Type 1 adhesive (Type 70 in SOPM 20-50-12) with a Semco roller, to make a continuous layer on the edge with the maximum thickness at the midpoint, as shown. The thickness of this layer can decrease from the center to the corners, but there must be a continuous layer of sealant on all edge surfaces and corners.
使用 Semco 滚筒涂抹 BMS 5-92 类型 1 粘合剂(SOPM 20-50-12 中的类型 70),在边缘形成连续的涂层,如图所示,最大厚度位于中间点。该层厚度可以从中心向角落逐渐变薄,但所有边缘表面和角落都必须有连续的密封胶层。
2) Unless specified by the overhaul instructions, overlap of the sealant on the adjacent surfaces is permitted, but keep the overlap as small as possible. Some overhaul instructions could specify that no overlap is permitted, to keep the edge seal away from aerodynamic surfaces, or areas which could become mating surfaces in a subsequent assembly. Remove the adhesive from such surfaces before it cures, to make the adhesive flush with the part surface, as shown.
除非大修说明另有规定,允许密封胶在相邻表面重叠,但重叠部分应尽可能小。有些大修说明可能规定不允许重叠,以使边缘密封胶远离空气动力学表面或后续组件中可能成为配合表面的区域。在粘合剂固化前将其从这些表面上去除,使粘合剂与零件表面齐平,如图所示。
3) Cure the adhesive as specified in Type 70 in SOPM 20-50-12, or for 6 hours at 70°-80°F before you apply primer, but do not apply pressure during the cure of the edge seal.
按照SOPM 20-50-12中类型70的规定固化粘合剂,或在涂底漆前在70°-80°F的温度下固化6小时,但在边缘密封固化期间不要施加压力。
(b) Method 2
方法2
1) Use the same procedure as Method 1, but the overlap on the edges is necessary as shown, unless the overhaul instructions specify that there be no overlay.
使用与方法1相同的步骤,但必须如图所示重叠边缘,除非大修说明中规定无需重叠。
2) Cure the adhesive as specified in Type 70 in SOPM 20-50-12, or for 6 hours at 70°-80°F before you apply primer, but do not apply pressure during the cure of the edge seal.
按照 SOPM 20-50-12 中类型 70 的说明固化粘合剂,或在涂底漆前在 70°-80°F 下固化 6 小时,但在固化边缘密封时不要施加压力。
16. ELECTRICAL SEALING 电气密封
A. General
通用
(1) Use these procedures to apply sealant to electrical installations unless specified by the overhaul instructions, or if the installation uses BACS45A seal fittings or ground studs.
除非大修说明另有规定,或者安装使用的是 BACS45A 密封配件或接地螺栓,否则应按照这些程序在电气装置上涂抹密封剂。
(2) Seal installations with BACS45A seal fittings as specified in BAC5108.
按照 BAC5108 中的规定,使用 BACS45A 密封配件密封装置。
(3) Seal ground studs as specified in Paragraph 16.B. below.
按照下文第 16.B 段的规定密封接地螺栓。
(4) The seals shown in these procedures are for absolute, extensive, and intermediate levels of sealing. For limited level of sealing, ignore the fillet sealant which is shown in the figures.
这些程序中所示的密封件适用于绝对密封、全面密封和中级密封。对于限定级密封,请忽略图中所示的圆角密封剂。
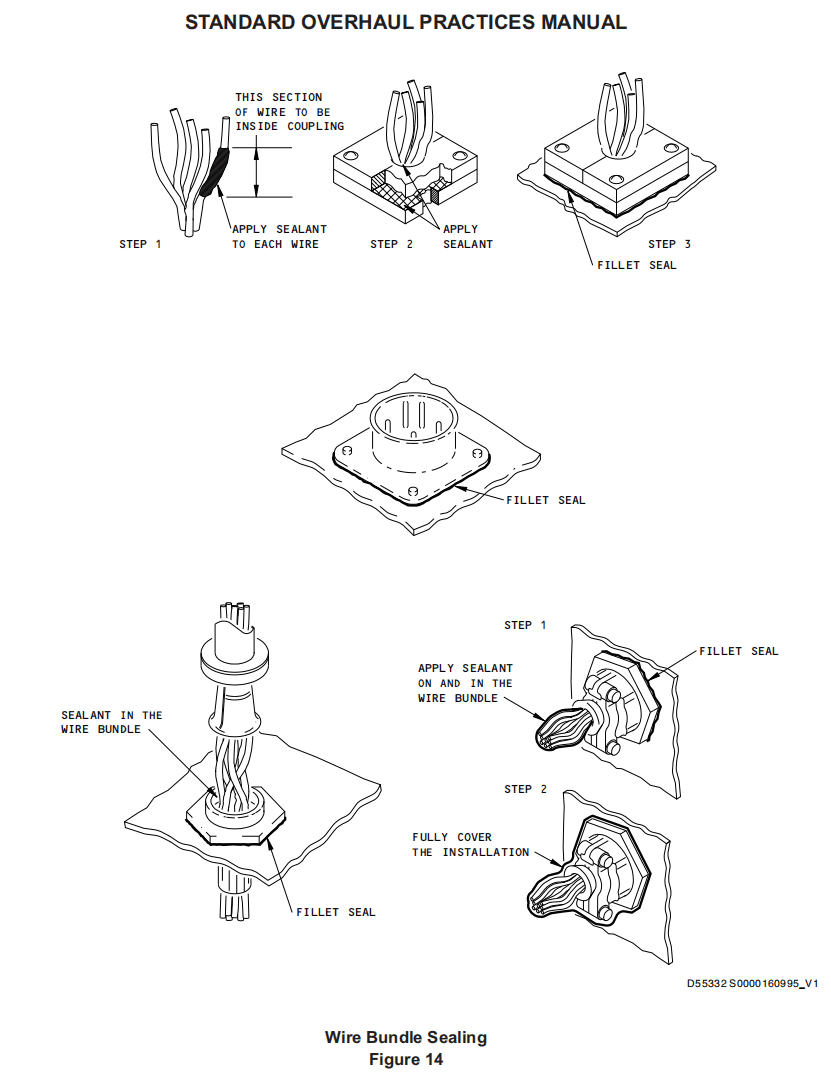
(5) Push each wire in the bundle apart and apply a layer of the specified sealant to the length of each wire which will go through the fairlead or coupling. Be sure to complete this task during the application time of the sealant.
将线束中的每根线分开,并在每根线穿过导缆孔或联轴器的长度上涂一层指定的密封剂。确保在密封剂适用期内完成此任务。
(6) After each wire has a layer of sealant, pull the bundle into position in the fairlead or coupling. Then fill completely around the bundle with sealant. Make sure all spaces are filled. See Figure 14 for sealing of typical wire installations.
在每根导线涂上一层密封胶后,将线束拉入导缆孔或连接器中。然后用密封胶填满线束周围。确保填满所有空隙。典型导线安装的密封方法见图14。
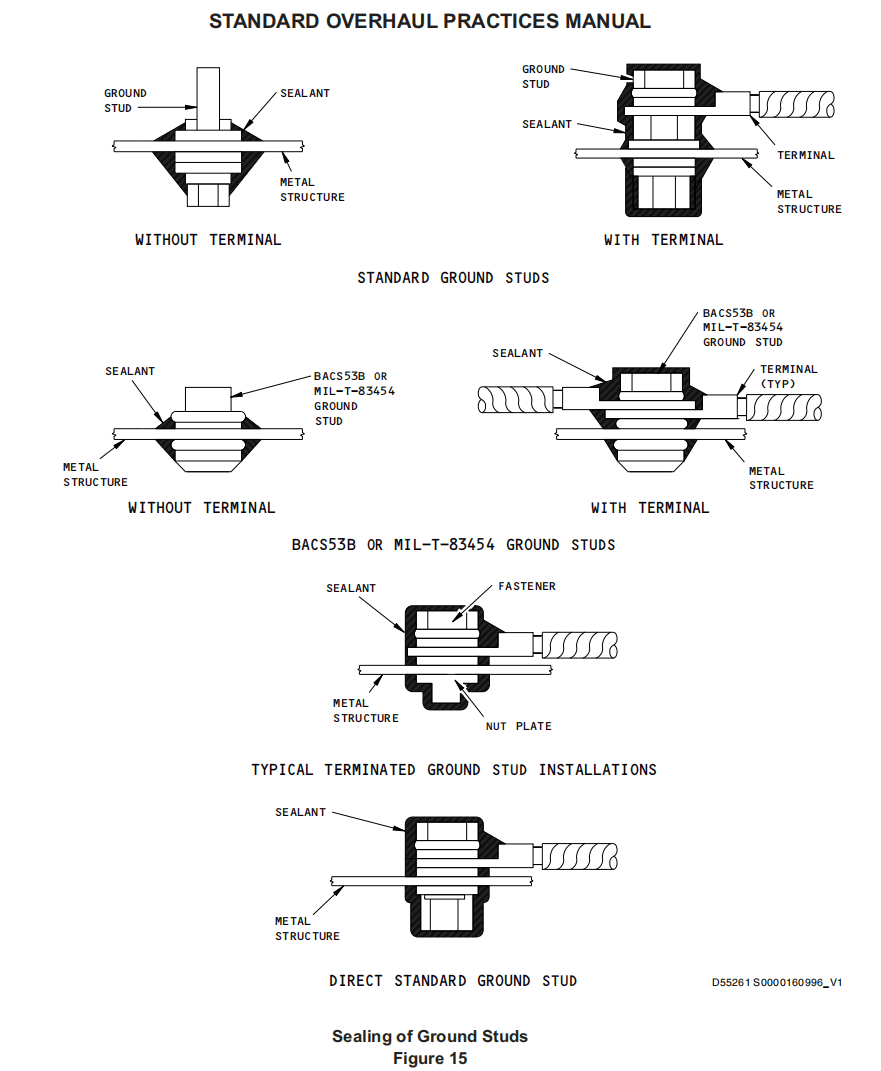
B. Ground Studs
接地螺栓
(1) When specified by the overhaul instructions, apply sealant to ground studs as shown in Figure 15.
如果大修说明有规定,如图15所示,在接地螺栓上涂抹密封胶。
(2) Do not apply sealant to the terminal contact surfaces of the nut or stud. The sealant will prevent correct electrical conductivity of the stud, and will prevent correct fit of the environmental cap.
不要在螺母或螺栓的端子接触面上涂抹密封胶。密封胶会妨碍螺栓的正常导电,也会妨碍环境盖的正常安装。
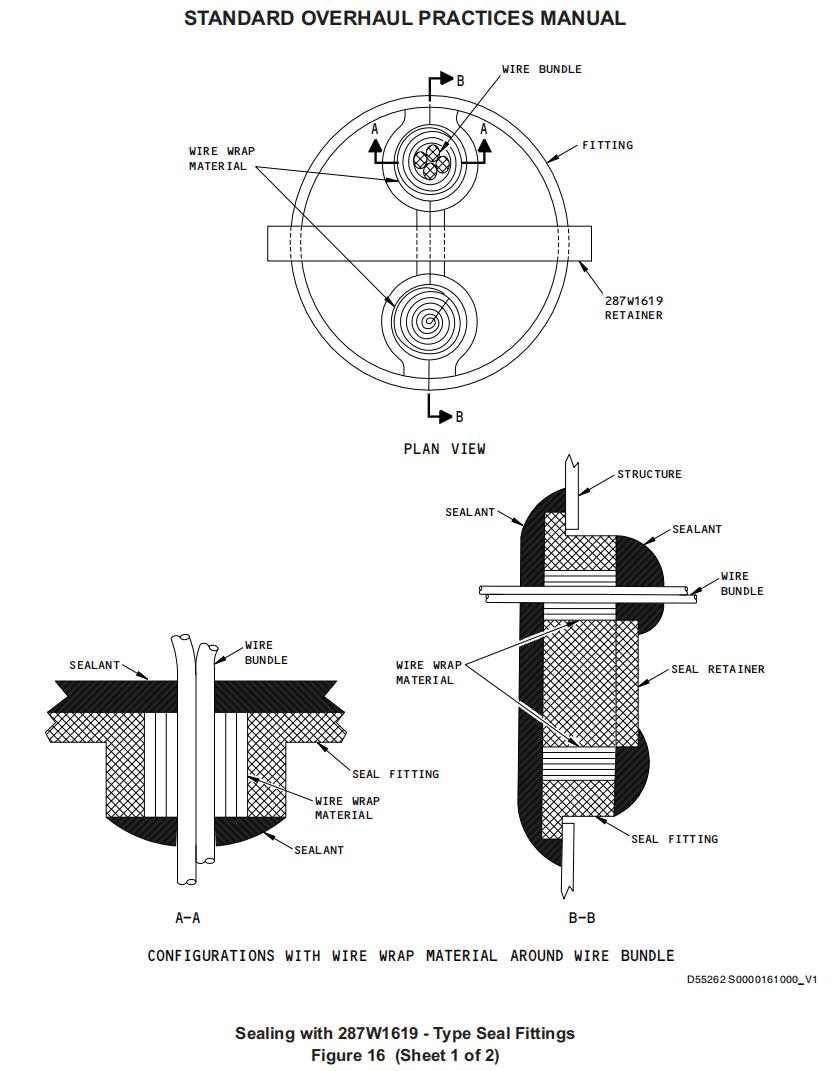
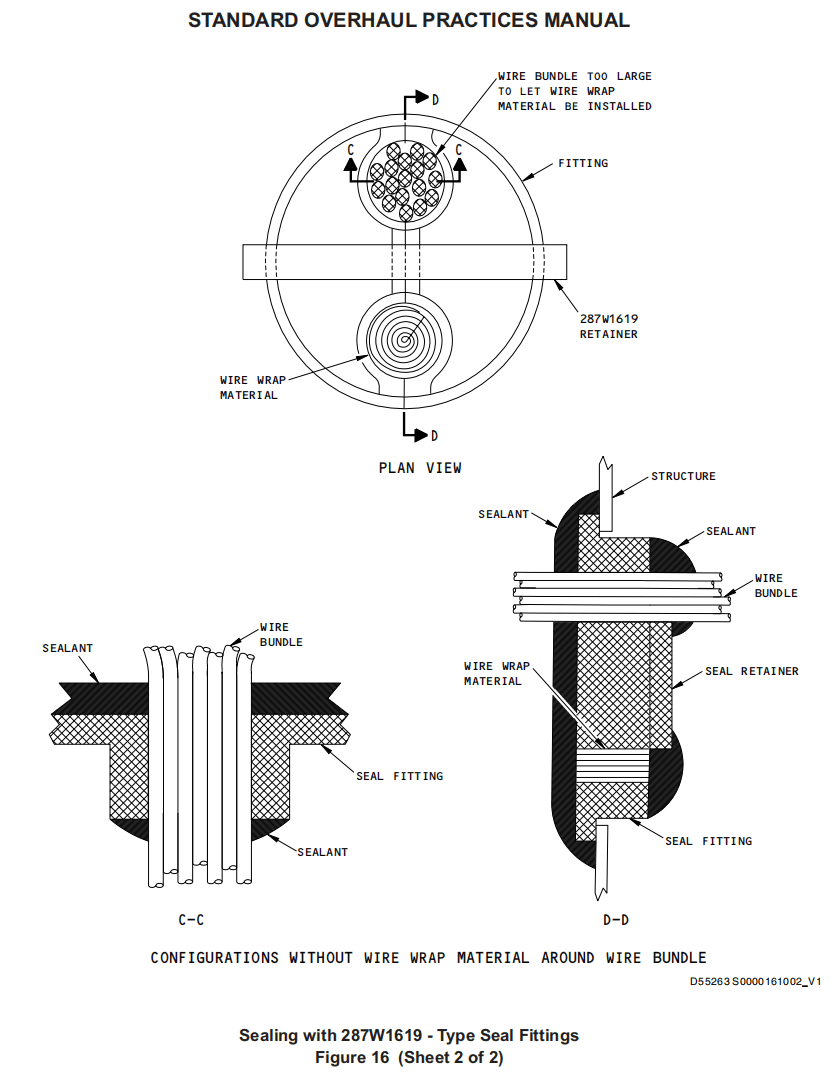
C. Installations With 287W1619-Type Seal fittings (Figure 16)
使用287W1619型密封配件的安装(图16)
(1) If there is a gap between the wire bundle and the seal fitting, wrap the wire bundle with a strip of BMS 8-300, Type 1 polyimide foam, or a wiper. Use one piece 0.050-0.75 inch wide, and of sufficient length to fit tightly between the wire bundle and the seal fitting when the wraps are tightly made.
如果电线束和密封接头之间有缝隙,请用BMS 8-300、1型聚酰亚胺泡沫塑料或刷子子包裹电线束。使用一块0.050-0.75英寸宽、足够长的材料,当包裹紧密时,使其紧密贴合电线束和密封接头。
(2) Compress this wire wrap material and push it into the wire penetration hole if necessary.
如有必要,将此绕线材料压缩并推入电线贯穿孔。
(3) Fill the other wire penetration holes with a coiled and compressed strip of wire wrap material, as shown.
用盘绕并压缩的绕线材料条填充其他电线贯穿孔,如图所示。
(4) Apply sealant (as specified by the overhaul instructions or as specified in Table 2) to completely cover the flat face of the fitting, the wire bundle, and the wire wrap material, as shown. It is not necessary to seal between the individual wires, but there must be no voids or bare surfaces of wire wrap material.
如图所示,使用密封剂(根据大修说明或表2中的规定)完全覆盖接头、线束和线包材料的平面。无需密封各条线之间,但线包材料不得有空隙或裸露表面。
(5) If the clearance between the wire bundle and the seal fitting is not sufficient to wrap the wire bundle, fill the space with sealant.
如果线束和密封配件之间的间隙不足以包裹线束,则用密封胶填充空间。
(6) If the gap between the wire bundle and the seal fitting is not sufficient to fill with sealant, put the wire bundle into the seal fitting and apply sealant to the other side as shown. It is not necessary to seal between the individual wires.
如果线束和密封配件之间的间隙不足以填充密封胶,则将线束放入密封配件中,并在另一侧涂上密封胶,如图所示。无需在单独的电线之间进行密封。
17. CAULKING 填缝
A. Use this procedure to seal large holes or channels with fiberglass cloth and sealant.
使用此程序用玻璃纤维布和密封胶密封大孔或通道。
B. Clean the surfaces as specified in Paragraph 6.
按照第 6 段的规定清洁表面。
C. Soak small pieces of clean fiberglass cloth with BMS 5-45, Class B sealant.
将小块干净的玻璃纤维布浸泡在 BMS 5-45 B 级密封胶中。
D. Put the soaked fiberglass cloth pieces into the void or channel, then push the pieces down. Put more pieces in, then push them down, until the void or channel is completely filled.
将浸泡过的玻璃纤维布放入空隙或通道中,然后向下推。放入更多玻璃纤维布,然后向下推,直到完全填满空隙或通道。
E. Make the filled surfaces flush with the adjacent surfaces of the part with a fairing tool.
使用整流罩工具使填充表面与零件的相邻表面齐平。
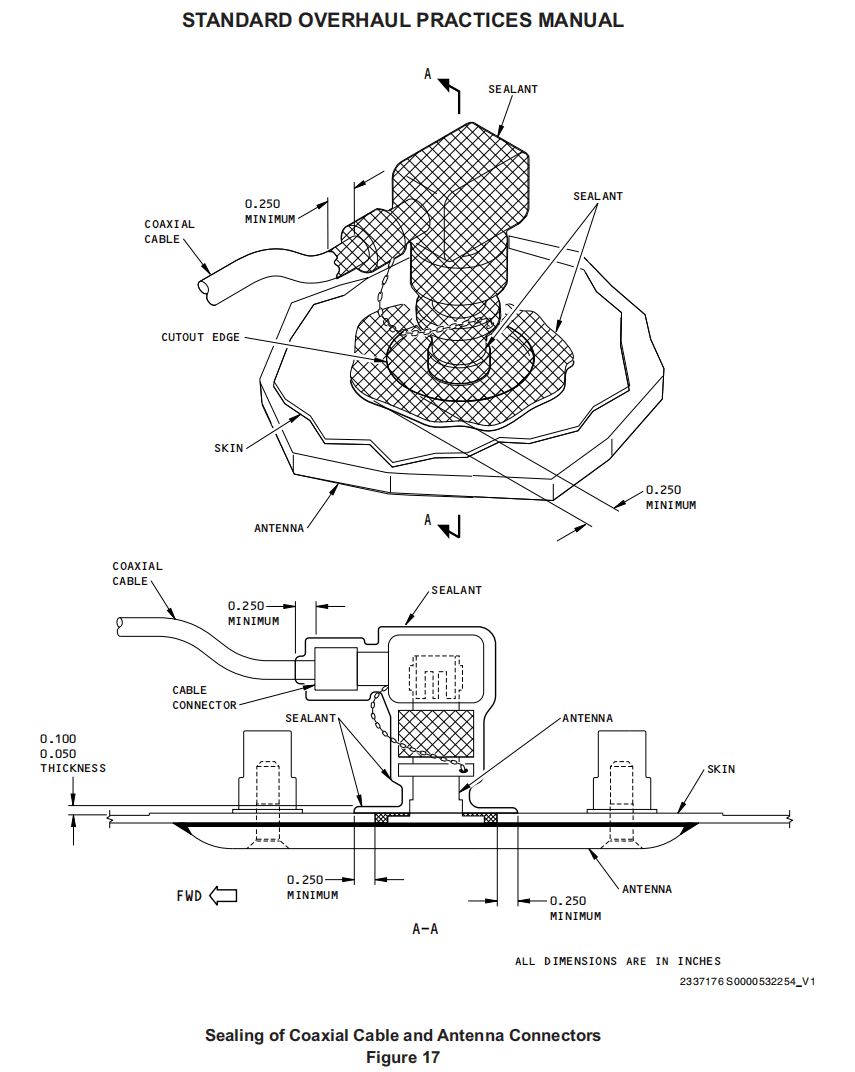
18. COAXIAL CABLE AND ANTENNA CONNECTIONS 同轴电缆和天线连接器
A. Use this procedure to seal coaxial cable connectors that are attached to antenna connectors.
使用此程序密封连接到天线连接器的同轴电缆连接器。
B. Clean the surfaces to get the sealant as follows:
按照以下步骤清洁表面以涂上密封胶:
(1) Clean around the cutout on the part surface as specified in Paragraph 6.
按照第 6 段的规定清洁零件表面切口周围。
(2) Final clean the antenna and coaxial cable connectors as specified in Paragraph 6., but use only isopropyl alcohol as the solvent. Fully remove all of the isopropyl alcohol with BMS 15-5, Class A wipers. Do not use too much alcohol.
最后按照第 6 段所述清洁天线和同轴电缆连接器,但只能使用异丙醇作为溶剂。用 BMS 15-5(A 级刷子)彻底清除所有异丙醇。不要使用过多的酒精。
C. Within the 1-hour application time of the sealant, brush-apply a minimum of two applications of BMS 5-37, Class A sealant to get a cured thickness of approximately 0.050-0.100 inch. Wait approximately 5-10 minutes between sealant applications.
在密封胶的1小时适用时间内,至少刷涂两次BMS 5-37 A级密封胶,固化厚度约为0.050-0.100英寸。两次涂胶之间应间隔5-10分钟。
NOTE: A minimum of two layers of sealant is necessary to be sure of complete coverage and to build a film that is sufficiently thick and strong to be easily removed. If the film is too thin, the sealant will break during removal. A wet film gauge can be used to make an estimate of the thickness of the sealant film.
注意:为确保完全覆盖并形成足够厚且坚固的膜层以便于拆卸,至少需要涂两层密封胶。如果膜层太薄,密封胶在拆卸时可能会断裂。可以使用湿膜计来估算密封胶膜层的厚度。
(1) Apply sealant to the coaxial cable connector, the antenna connector and the cutout in the part as shown in Figure 17.
在同轴电缆接头、天线接头和零件上的切口处涂上密封胶,如图17所示。
(2) Make sure the sealant gives complete coverage under the gap where the coaxial cable connector and the antenna connector come together as shown in Figure 17.
确保密封胶完全覆盖同轴电缆接头和天线接头连接处的缝隙,如图17所示。
(3) Extend the sealant approximately 0.250 inch out from the coaxial cable connector onto the wire, and a maximum of 0.250 inch out from the cutout in the part, as shown in Figure 17.
从同轴电缆连接器处向电线方向延伸密封胶约0.250英寸,从零件上的切口处延伸最多0.250英寸,如图17所示。
D. Repair the surfaces of the part or the connectors that are visible through the sealant as follows:
修复零件或连接器的表面,使其通过密封胶可见,具体如下:
(1) If the sealant on the part is within the 1-hour application time, the sealant can be pushed around to cover areas that are too thin, or more sealant can be added.
如果零件上的密封胶在1小时适用期内,可以将其推到太薄的区域,或者添加更多的密封胶。
(2) If the sealant on the part is cured, clean the sealant as specified in Paragraph 18.B.(2) and apply more sealant as necessary.
如果零件上的密封胶已经固化,请按照第18.B.(2)段的规定清洁密封胶,并根据需要添加更多的密封胶。
E. Bubbles in the sealant caused by the brush application are not cause for rejection.
刷涂密封胶时产生的气泡不会导致产品被拒收。
19. REPAIR OF BULB SEAL ON COCKPIT WINDOW 驾驶舱窗户灯泡密封条的修理
A. Use this procedure to repair cracks or air leaks in the bulb seal. If the bulb seal material contains silicone, be sure to use only silicone sealants or adhesives. Others will not bond to silicone surfaces.
使用此程序修理灯泡密封条上的裂缝或漏气。如果灯泡密封条材料中含有硅,请务必只使用硅密封胶或粘合剂。其他材料无法与硅表面粘合。
B. Find and mark the areas which have cracks or air leaks.
找到并标记有裂缝或漏气的区域。
C. Clean the area to be filled. Use the procedures of Paragraph 6.
清洁需要填充的区域。按照第6段所述步骤进行。
D. Get and mix the sealant. If the bulb seal material contains silicone, use Dow Corning 3-6093 or 3-6376 silicone sealant unless the overhaul instructions are different.
准备并混合密封胶。如果灯泡密封材料中含有硅,请使用道康宁3-6093或3-6376硅酮密封胶,除非大修说明另有规定。
E. Apply the sealant to the areas you found and marked in Paragraph 19.B. Make the sealant smooth with the adjacent bulb seal surfaces until the cracks are gone.
在第19.B段中找到并标记的区域涂抹密封胶。使密封胶与相邻的灯泡密封表面平滑,直至裂缝消失。
F. Let the sealant cure.
让密封胶固化。
G. If the cracks or air leaks are not gone, clean the surfaces and apply more sealant as specified in Paragraph 19.C. through Paragraph 19.F., as necessary.
如果裂缝或漏气仍未消失,请清洁表面并根据需要按照第19.C段至第19.F段中的说明涂抹更多密封胶。
20. REPAIR OF APPLIED SEALANT 已涂密封胶的修复
A. Use these procedures if the new sealant is damaged or was not applied correctly. There are procedures for sealant before and after the application time expires, and a special procedure for problems with edge seals in composites.
如果新的密封胶损坏或涂覆不正确,请按照以下步骤进行修复。密封胶在适用期到期前和到期后都有相应的修复步骤,复合材料边缘密封问题也有专门的修复步骤。
B. Fillets Damaged, Incorrect or Too Small
损坏、不正确或过小的圆角
(1) Before the sealant application time expires.
在密封胶适用期限到期前。
(a) Remove the damaged fillets and apply new sealant as specified in Paragraph 13., or
去除损坏的圆角,并按照第13段的规定涂抹新的密封胶,或
(b) Add more sealant, or use a tool to make the fillet correct.
添加更多密封胶,或使用工具修正圆角。
(2) After the sealant application time expires
在密封胶适用期限到期后
(a) Damaged or incorrect fillets
损坏或不正确的圆角
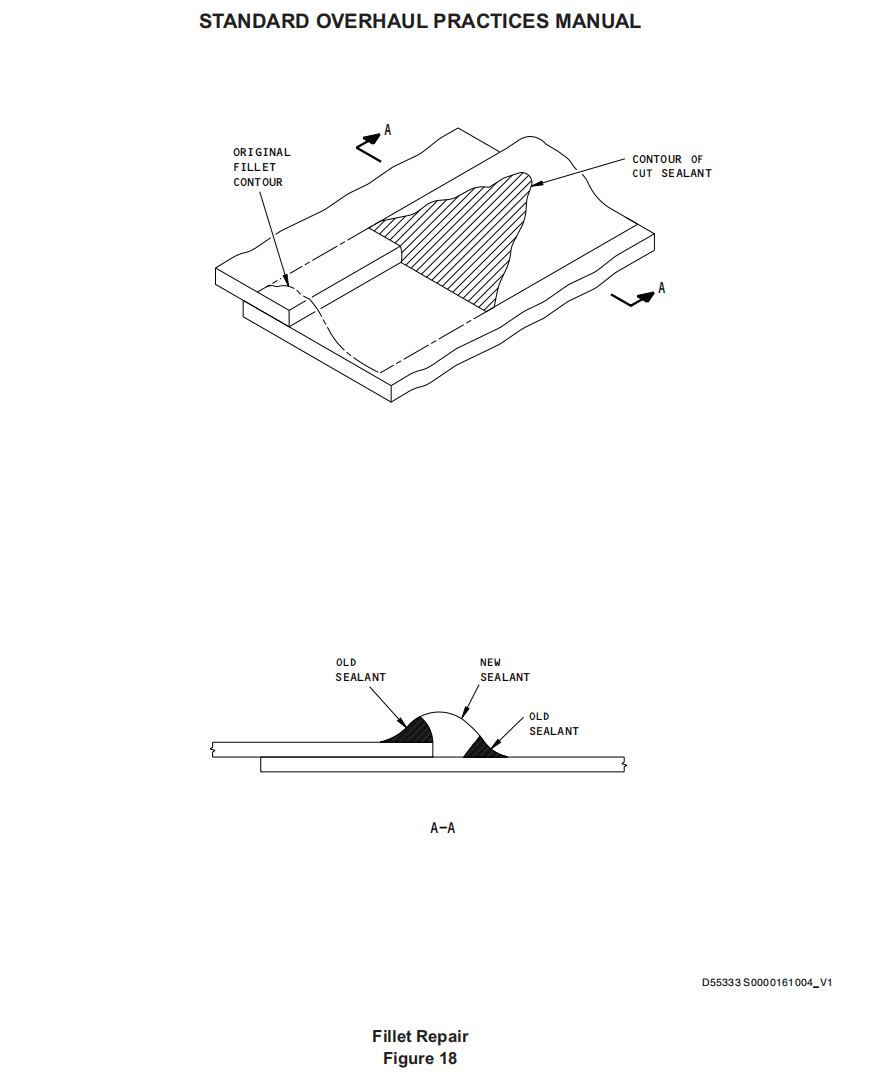
1) Completely remove the fillet. Or cut out the bad areas to let solid sealant stay, as shown in Figure 18. Be sure to cut the sealant with tools that do not contain abrasives, to prevent damage to the surface of the part. Make sure the cuts are clean and include notches for access.
完全去除圆角。或者切除不良区域,保留固体密封胶,如图18所示。确保使用不含研磨剂的工具切割密封胶,以防止损坏零件表面。确保切口干净,并留有便于操作的凹槽。
2) Remove loose chunks or flaps of sealant from the cut area.
去除切口区域的松散块状物或密封胶。
3) Clean the area as specified in Paragraph 6.
按照第6段的规定清洁该区域。
4) Apply new fillets as specified in Paragraph 13.
按照第 13 段的规定,涂抹新的圆角。
(b) Fillets Too Small
圆角太小
1) Clean the fillet and the adjacent area as specified in Paragraph 6.
按照第 6 段的规定,清洁圆角和相邻区域。
2) Apply more sealant and make it smooth with the fillet that was there.
涂抹更多的密封胶,使其与原来的圆角平滑。
C. Quick Repair
快速修复
(1) Do not use this procedure to repair silicone sealants. Examples of silicone sealants are:
不要使用此程序修复硅酮密封胶。硅酮密封胶的示例包括:
(a) BMS 5-63
(b) Dow-Corning Q3-7063, RTV 730, 93-006
(c) GE RTV 174
(2) Use the procedure of Paragraph 20.B. above and these sealants:
使用上文第 20.B. 段所述程序和以下密封剂:
(a) BMS 5-45, Class B-1/2
(b) BMS 5-95, Class B-1/2
(c) PR-1826, Class B-1/2 or B-1/4 (but not on clad aluminum)
(d) PR-1828, Class B-1/2 or B-1/4
(3) For the PR-1826 sealant, a primer is necessary on all surfaces.
对于PR-1826密封胶,所有表面都需要涂底漆。
(4) The PR-1828 sealant will bond to most surfaces. On clad aluminum, you can rub the surface with Scotch-Brite until the surface is dull, to make a better bond.
PR-1828密封胶可与大多数表面粘合。在复合铝上,可以用思高牌百洁布擦拭表面,直到表面变暗,以获得更好的粘合效果。
(5) Do not apply the PR-1826 or PR-1828 sealants on or near acrylic windows or other acrylic components. These sealants can cause crazing of acrylics.
不要在丙烯酸窗户或其他丙烯酸部件上或附近使用PR-1826或PR-1828密封胶。这些密封胶可能会导致丙烯酸出现裂纹。
D. Problems With Edge Seals on Composite Surfaces.
复合表面边缘密封的问题。
(1) Sealant on surfaces where it is unwanted — If the material is 0.001 inch thick or less, it can stay. If the material is more than 0.001 inch thick, remove the material as necessary to decrease the thickness to 0.001 inch or less. Be careful not to damage the composite surface under the sealant.
表面不需要密封胶——如果材料厚度为0.001英寸或更薄,则可以保留。如果材料厚度超过0.001英寸,则应视需要去除材料,将厚度减小到0.001英寸或更薄。注意不要损坏密封胶下方的复合表面。
(2) Surface scratches are permitted in the edge seal if they do not go through to the surface of the part.
边缘密封件表面允许有划痕,只要划痕未穿透零件表面即可。
(3) Missing sealant from the edges — Solvent clean the areas. Lightly sand, then solvent clean the surfaces again. If there is primer on the surfaces, it can stay. Apply more sealant and let it cure as specified in Paragraph 15.F.
边缘密封胶缺失——用溶剂清洁该区域。轻轻打磨,然后再次用溶剂清洁表面。如果表面有底漆,可以保留。涂上更多密封胶,并按照第15.F段的规定进行固化。
(4) Surface pits, depressions, and edges with primer applied over the edge seal — Solvent clean the areas. Lightly sand, then solvent clean the surfaces again. Apply more sealant and let it cure as specified in Paragraph 15.F.
表面凹坑、凹陷和边缘,边缘密封层上涂有底漆——用溶剂清洁这些区域。轻轻打磨,然后再次用溶剂清洁表面。涂上更多的密封胶,并按照第15.F段的规定进行固化。
(5) Surfaces rough or with high spots — Sand the local area to remove the defects. Do not sand into fibers. Apply more sealant only if this makes the composite surface bare.
表面粗糙或有高凸点——打磨局部区域以消除缺陷。不要打磨到纤维。只有在复合表面裸露的情况下,才涂上更多的密封胶。